Add/Edit/Delete Projects
Creating a Project
The first step in working with a project is creating one! When you launch the Designer, the Open/Create Project window is displayed. You will have the option to create a new project or open an existing project.
For a quick walk-through to create a new project and start developing, see the Quick Start Guide.
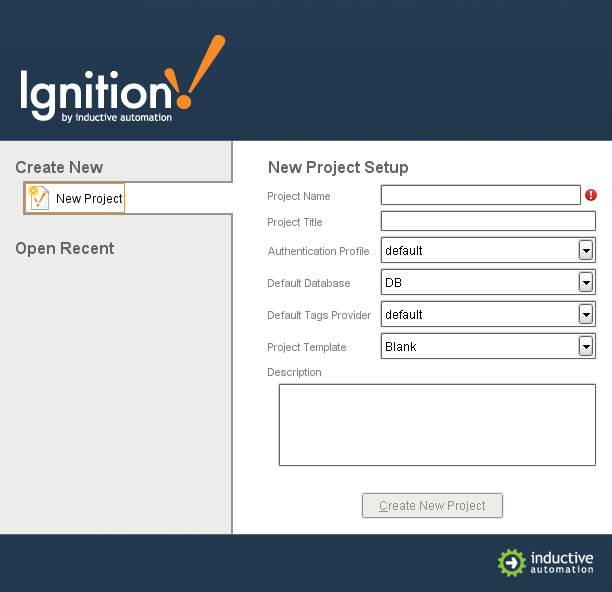
To create a new project, click on New Project and define following information:
-
Project Name: A unique name for the project in the system. The name can only consist of alphanumeric characters and the '_' character. Spaces and other special characters are not supported.
Note: it is not advisable to change the name after it's been created, instead, change the Project Title if you want to change how the project appears later. -
Project Title: This is the name that will be displayed on the launch page of the Gateway and in the runtime Client. There are no restrictions to special characters or spaces.
-
Authentication Profile: The profile to use for granting access to the project. For more information or to add users, see Security.
-
Default Database: Any queries to the database will use this default database connection unless explicitly specified otherwise.
-
Default Tags Provider: The primary Tag provider for the project. Most installations will likely only have one provider, but in situations where there are more than one, this is the provider that will be used unless explicitly specified otherwise.
-
Project Template: Gives you the option to choose a quick start template for your project. Most people start with a simple 1-tier navigation option. Click the dropdown to see all the available options.
Managing Projects
Once you have a project or two (or twenty) set up, you might want to change some of the base settings. You can manage the projects from the Configure section of Gateway by going to Configuration > Projects. The Projects window is displayed and from here you can view, edit, delete, copy, or export each project. Look to the right of the project name, to see the link for these actions.
Note: You can manage many of these things in the Designer, and much more (such as the Client Poll Rate, Publish Mode, etc). See the Project Properties page for more information.
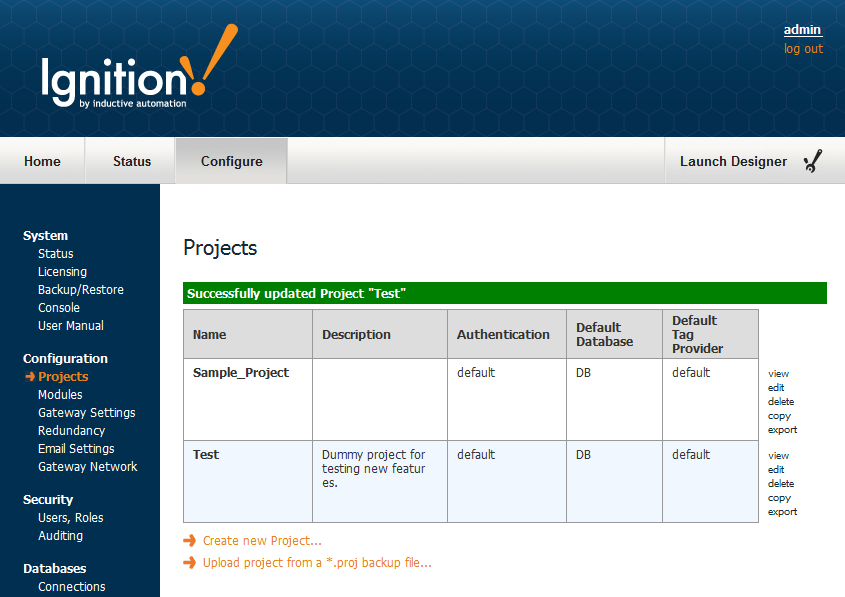
Viewing a Project
The view link on the Project window, takes you to the Project details for '<Project Name>' page where you can choose to view the Published or Staging version of the project.
Have you ever seen <object name> with those weird greater than/less than signs before? We do this a lot in the user manual because Ignition will often use your specific names. Don't worry about it, this just means you should expect to see whatever your name is in that spot. IE: If your project name is "Project 1", then you will see Project details for 'Project 1'.
Editing a Project
To edit some of the project settings, go to the Configure section of Gateway, and then to Configuration > Projects. You will see a list of all your projects. Click edit to the right of project name in the list. The Edit Project page is displayed. You can now change some of the project settings such as project name, description, and title. You can also change connections to the Authentication profile, default database, and default tag provider.
Many of these settings can be modified in the Designer too, but it is important to note that you cannot change any of these project settings from the Gateway if the project is currently open in a Designer.
Copying a Project
Copying your project is useful when you need a snapshot of a project before starting major changes, or for creating a starting point for a new project based on an old one.
To copy a project, go to the Configure section of Gateway, and then to Configuration > Projects. You will now see a list of all your projects. To the right of the project name in the list, click copy. This creates a copy of your project.
Project Settings
Published vs Staging
Each project can have two distinct versions at the same time: the Staging version and the Published version. Having a staging version allows you to make changes to a project, save the changes, and test out the changes before "publishing" it to a production environment.
Normal Vision module Clients run the published version of a project. However, by launching a Client in a special mode (from the Designer or from the Config section of the Gateway), you can launch a Client that runs the staging version of that project. This staging Client will receive updates on every save, where the production Clients receive updates only on publish. This lets you test out your changes to the project in an actual Client, which is more realistic than the Designer's preview mode.
Not all aspects of a project use this system. It is primarily intended for systems such as the Vision module's Clients. Features that run persistently on the Gateway such as Tags, the SQL Bridge's Transaction Groups, and Gateway-side scripting always run the most recently saved changes (the Staging version). Since these features by definition must run in exactly one place, they cannot be effectively "tested out" by simultaneously running a staging version alongside a published version.
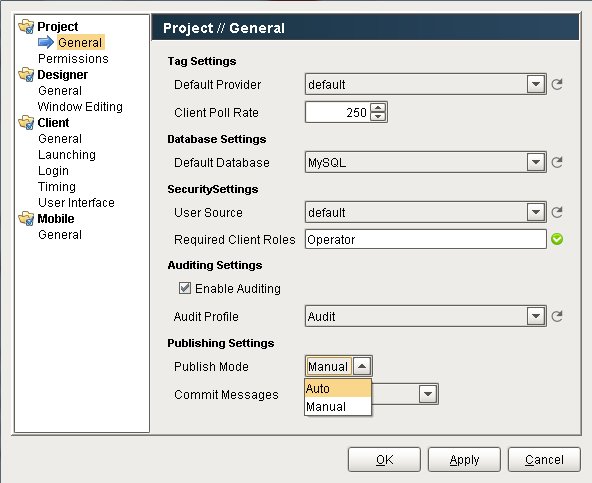
In the Designer, choose the Project > Properties menu item, then go to the Project > General page to set the Publish Mode. By default, a new project is configured to be in Auto publish mode, however you can change it to Manual publish mode.
-
In the default Auto mode, when you want to save your project, Designer lets you do a File > Save and Publish, which means both the Staging and the Published versions will be the same and identical.
-
In Manual mode, when you want to save your project, Designer lets you do both a File > Save or a File > Publish. File > Save updates the Staging version, and File > Publish updates the Published version.
Commit Messages
A project may be configured to prompt the user making changes to describe those changes, either on every publish event, or on every save and publish event. These messages, called commit messages, are used to describe the changes that have been made to the project. By inspecting the project's history and reading these commit messages, you can learn what changes have been made to the project, for what reason, and by whom.
Concurrent Project Development
Often in large facilities there are multiple people working on the same project. Multiple Ignition Designers can be launched concurrently, and everyone can work on the same project at the same time. Because everything is controlled in the Gateway, there is no merging or syncing required when you save your changes. When a particular resource (window, template, etc) is being edited, it will be locked, and the other designers won't be able to modify the locked resources. When the resource is closed and saved, it's automatically unlocked. Concurrent edits are pushed to other designers only when you update your project. You can do this by going to the menubar in the Designer and selecting File > Update Project.
Similar Topics ...