Create a Template
Templates are a simple but very powerful feature that you can use with your Vision windows. Using templates, you would define the graphics and parameters in one place, called the master template. You then create instances throughout your project that update whenever the master/parent template is changed.
Create a Template
Here we create a basic template. After the template is configured, you can create multiple instances of it throughout your project.
-
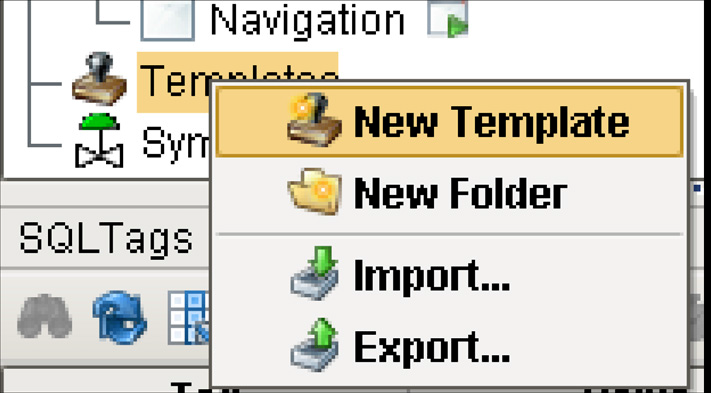
In the Project Browser, right-click Templates and select New Template.
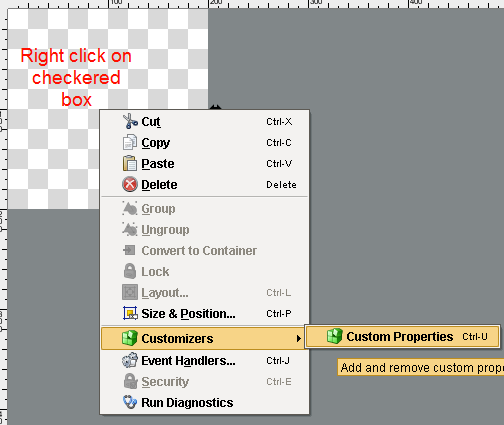
A checkered box is displayed in the design space where you design your template. The checkered box means that the template is completely transparent. You can set a background if you want.
-
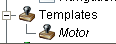
Right-click on New Template and click Rename to change its name to something else, lets say Motor.
-
Right-click on the checkered-box and select Customizers > Custom Properties.
The Custom Properties window is displayed. Here you can set both the Template Parameters and Internal Properties. Template Parameters appear on each template instance, allowing each instance to be configured differently, this is some sort of an indirection variable. Internal properties show up when designing the template master, but they do not show up on the template instances.
Each template needs at least one Template Parameter property so that it can exist on every instance you put on the screens. Then each instance can bind the parameter property to a tag.
-
In the Custom Properties window, click the + icon in the Template Parameter area to add the values.
-
Enter the following and click OK.
Name: value
Type: Integer
Drop Target: select the check box
-
Go to the checkered area of your template, from the Symbol Factory and Component Palette drag one or a few components such as a motor, a label, and a Level Indicator.
-
Resize the checkered area to fit all your components, and not larger, to remove all the unusable space.
Now we need to link one of the components, lets say the Level Indicator, to the Template Parameter value we created earlier. -
Select the Level Indicator and go to the Property Editor, click on the binding icon for the Value property.
The Property Binding window is displayed. -
Click the Property button, choose the value property, and click OK.
You now have configured a motor template, with a parameter property called value with an integer data type. Use this template to create many instances of it in your project.
Using the Template
Once you have a template, here are some of the things you can do with it.
Renaming the Template
You can rename your template by clicking on its name in the Project Browser and pressing F2, or changing the name in the Property Editor.
Creating the Template Instances
Once you've made your template, you can use it on any of the windows in your project by doing any one of the following steps:
-
You can drag the template from the Project Browser into an open window just like you can drag components into the window for display.
-
You can right-click on the template and choose Use In Window, which will let you place the template inside a window with another click.
-
You can drag a tag from the Tag Browser to a window and from the pop-up menu, which is displayed, you can choose a template.
The template instance can then be moved and resized like any other component.
Binding Template Properties
Templates have the capability to incorporate custom properties. In this way, they are the same as any other Ignition components. The main difference between the custom properties for an Ignition component and a template is that the template has internal properties and template parameters.
-
Internal Properties
Internal properties help facilitate the bindings within a template in the same way that a window's root container will help facilitate bindings between components that make up the template. When a template is deployed onto a window the internal custom properties are not exposed to the world outside the template. -
Template Parameters
The template parameters are the template's custom properties that are exposed to the outside world. In other words, when a template is deployed onto the root container of a window, the template parameters are available for binding with the objects on that window or to tags.
Editing a Template
You can open a template for editing by double-clicking on it in the Project Browser, or by double-clicking any instance of that template within a window. You design your template the same way you design windows: by adding components to it, and configuring those components using property bindings and scripting.
There are a few differences between templates and windows from an editing perspective. Templates, unlike windows, have a transparent background by default. This can be changed simply by editing the background color of the template. Templates also do not have the concept of the "Root Container" - the template itself acts like a container.
Once you change the master template, all the instances of that template are updated.