Tag Historian and Tables
Displaying Tag Historian Data
Displaying Tag Historian data on a Table component is easy! When the Designer is in design mode, simply drag and drop a historical tag (a tag with history enabled) on to a Table component.
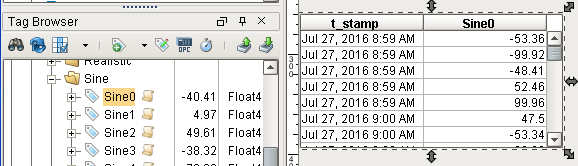
When the tag was dropped, Designer will recognize the action, and create a Tag History Binding on the Table's Data property. The default configuration on the binding uses a Realtime date range looking at the most recent 10 minutes. The Sample Size is Natural, and polling is off.
Manually Creating the Binding
Instead of dragging-and-dropping the tag, you could instead create the binding manual by editing the Data property on the table. While this approach is slightly slower to implement than dragging-and-dropping the tags, it has some benefits, such as filtering out non-historical tags, and allowing immediate access properties on the binding. Additionally, components that do not support drag-and-drop could be used instead.
To manually create a Tag History Binding
-
Drag a Table (or a Power Table) from the Component Palette into your window.
-
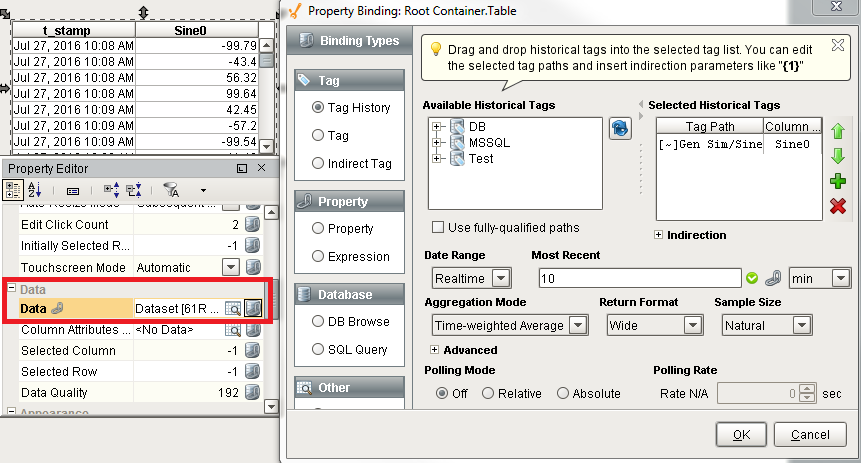
In the Property Editor, go to the Data property, and click the binding icon.
The Property Binding window is displayed. -
Select the Tag History option.
-
From Available Historical Tags, find the desired historical tags by selecting and expanding the historical providers.
-
Once you have found the tag, drag it into to the right into Selected Historical Tags.
-
For Date Range, select Realtime from the drop-down list, and in the Most Recent text box, enter the amount of time in the past.
-
Select the appropriate Aggregation Mode.
-
Set Polling Mode to Relative to see table update at the project's Base Rate.
-
Click OK.
From the Binding window we can make several configurations changes to modify how the data is displayed. The following information on this page demonstrates several different configurations of the Tag History Binding applied to a Table component. However, these examples could easily be adapted to other components that display data by timestamp, such as the standard Chart component. Even a dataset-type custom property could be used.
Date Range Property
Once the binding has been created, the displayed data can be altered and tweaked in several ways. The following sections on this page give some examples of such alterations.
Date Range - Realtime
The Realtime date range will show history between now, meaning the last time the binding polled for data, and some unit of time in the past. This mode is great if you need to show history spanning the last several X units of time. Note that tag history bindings update when polling, so creating a a real-time chart is a breeze when polling is turned on.
Date Range - Historical
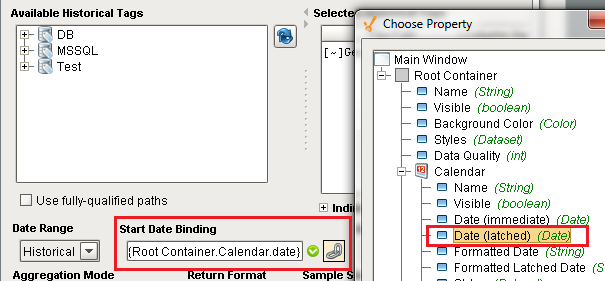
The Historical date range will show historical data between two points in time.
When selected, a Start Data Binding and End Date Binding property will appear. There must be a date property on the window for these property to bind ![]() to. Commonly a Calendar or Date Range component is used, so users can change the date range from the client. Below is an example of a binding that is making use of a Calendar component. The component is in the same container as the Table. The Start Date Binding property on the Table is bound to the Calendar's Date(latched) property.
to. Commonly a Calendar or Date Range component is used, so users can change the date range from the client. Below is an example of a binding that is making use of a Calendar component. The component is in the same container as the Table. The Start Date Binding property on the Table is bound to the Calendar's Date(latched) property.
A similar binding should be make with End Date Binding, but with a different calendar. This way, users will be able to select the exact range for the table to display.
Sample Size Property
The following examples focus on the Sample Size property to determine how many datapoints the binding should return. More details can be found on the Tag History Aggregates page.
Sample Size - Fixed
You can use the Sample Size and Aggregation Mode on the Tag History binding type to fix the number of records that are retrieved. The Fixed sample size will cause the binding to retrieve all records from the date range, and aggregate them evenly between a fixed number of points. This will ensure that the number of rows will remain the same without regard to the size of the data-set. In windows where users are able to select a large range of data, Fixed is recommended as it will prevent the property from loading an excessive number of records.
In cases where the number of points can not evenly represent the data from the date range, an extra point will be added, making the final size of the dataset the fixed value + 1.
Selecting the Min/Max aggregation mode returns two rows of data for every row requested. Each pair represents a minimum and a maximum result from the underlying data. Therefore, a table with a fixed length, would return double the requested amount with Min/Max aggregation mode selected. With Min/Max aggregation mode selected, and with a fixed row length of one, the data set returns the oldest tag value of the time range
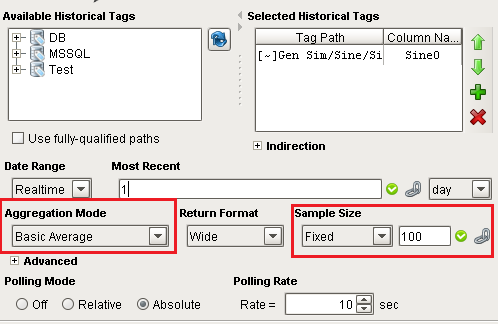
The following image shows a Tag History Binding pulling data from the last 1 day. The Sample Size is configured to Fix with a value of 100, and the Aggregation Mode is set to Basic Average. This means that the binding will query for data from the last 1 day, regardless of how many records there are, and create 100 time-slices that are evenly dispersed between the start and end periods of that range. Then, a basic average of the tag values are calculated for each time-slice. The resulting values are then returned to the property.
Note the binding icon ![]() next to Sample Size. This allows a property binding to determine the number of data points, so you could change the size to increase or reduce the amount datapoints on the chart from the client.
next to Sample Size. This allows a property binding to determine the number of data points, so you could change the size to increase or reduce the amount datapoints on the chart from the client.
Sample Size - Interval
Where as the Fixed sample size will calculate time-slices based on the date range, the Interval sample size allows you to determine the size of the time-slices. This sample size will divide the date range by the interval size to determine the size of each slice. Because of this, it is recommended to use an interval that is evenly divisible by the date range. However, in the event that the date range is dynamic or user driven, interpolation will handle any partially built slices. Even though the binding may attempt to evenly distribute the slices, there may be an extra row that represents the current values as they are building an interval.
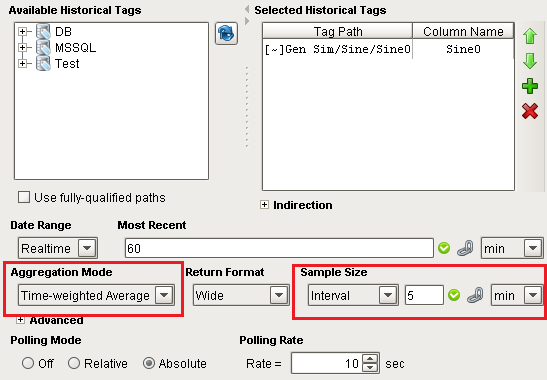
The image below shows a Realtime range of 60 minutes. The Aggregation Mode is set to Time-weighted Average, and the Sample Size is set to Interval 5 minutes. This means that the binding will query for data ranging from 60 minutes ago to now (or whenever the binding last executed, in the case that polling has been turned off). That 60 minute window will be divided as evenly as possible into 5 minute time-slices, so there should around 12 time-slices. Each time slice will aggregate it's value based on the time-weighted average of all values within that slice.
The example uses a Realtime range, but a Historical range could easily be used instead.
Again, the values of Most Recent and Sample Size can be bound using the binding icon ![]() , so the size of the slices can change in the client.
, so the size of the slices can change in the client.
In This Section ...