User Schedules
Schedules define the times of on-call availability and unavailability. For example, the Always schedule is a schedule that is active 24/7. You can set a schedule for each user in the alarm notification system. The notification messages are then sent only to those users with an active schedule. When a message reaches a notification block in a pipeline, that block's on-call roster is used to find the users with active schedules so they can be notified.
To define a new schedule
-
Go to the Configure section of the Gateway.
-
Choose Alarming > Schedules from the menu on the left.
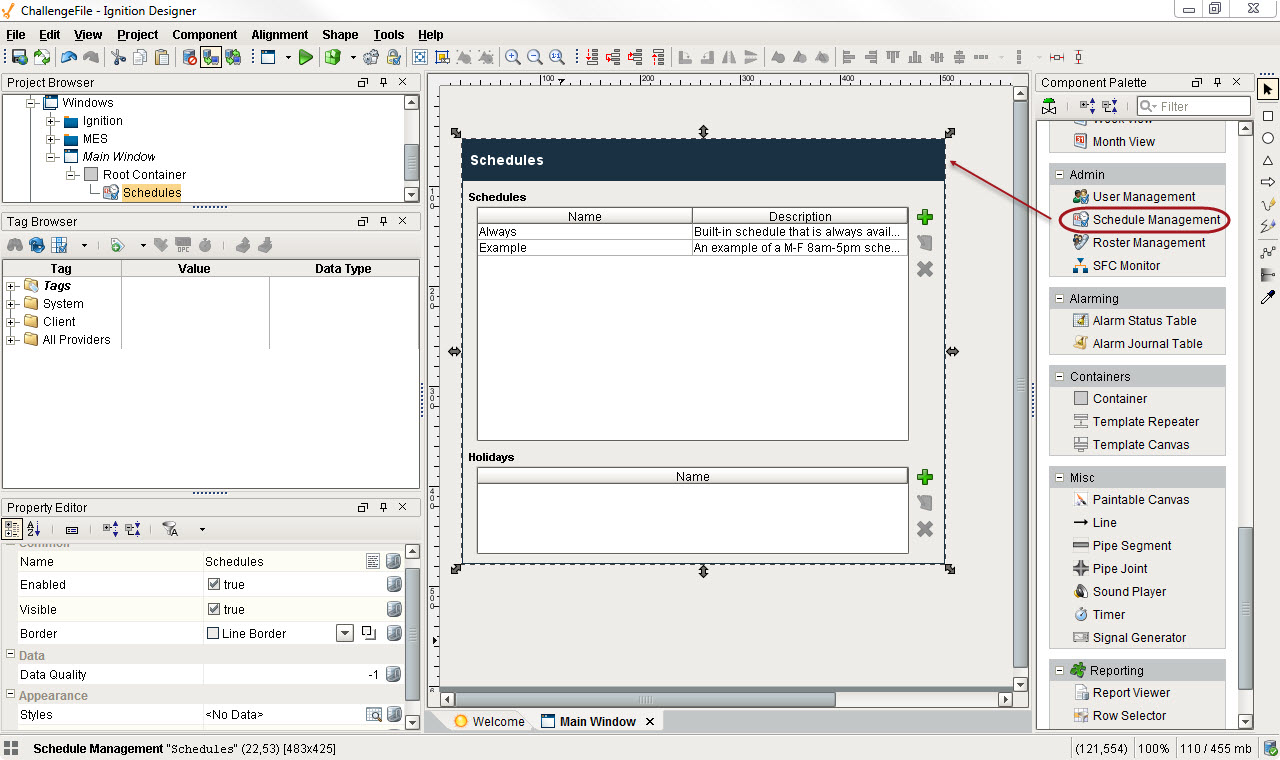
The Schedule Management page is displayed. Here you can see an Always and an Example schedule.
The Always Schedule is a built-in schedule that is always available: 24x7x365.
The Example Schedule is an example of a M-F 8am-5pm schedule with a lunch break. Click on the edit to see the detailed settings. -
Click on Create new Schedule.
-
Choose a Standard or Composite schedule and click Next.
The Standard schedule is defined by hours of operation on each day, with repeating options.
The Composite schedule is defined by the combining of two other schedules.
-
On the New Schedule page, enter a Name, the Schedule to be notified, and any Repeating options, then click Add Schedule.
Each schedule is defined by which days of the week it is active for, and during what times. Additionally, you can define repeating patterns that repeat either weekly or daily. When defining time ranges, use 24-hour format and commas to break up different spans. For example, to if you want the schedule to be active from 8am-5pm with a 45 minute break starting at noon, you'd use: 8:00-12:00, 12:45-17:00.
To manage schedules from the Client
You can manage schedules from a Vision Client.
-
Open your design project in the Designer.
-
From the Component Palette, drag and drop a Schedule Management component in your design.
-
Save your project.
Users can now manage the schedule from the Client.
Using Schedules for Alarm Notification
The alarm notification system always uses the Schedules. When an alarm notification pipeline reaches a notification block, it looks at all of the users defined in that block's configured on-call roster. Only those users whose schedules are currently active will be notified. This way, you can group people in call rosters by role, not by shift. For example, suppose you have alarms that should be sent to all supervisors. You can put all of the supervisors in one call roster, and the scheduling system will automatically only notify those supervisors who are on-shift when the alarm goes active.
Using Schedules for Restricting Login
You can use Schedules to restrict users' ability to log in. To enable this, select the Schedule Restricted option on the user source in question. That user source will then reject logins for users whose schedule is inactive, even if their credentials were accurate.
Similar Topics ...