Understanding Transaction Groups
Transaction Groups
Transaction Groups are the heart of the SQL Bridge module. They are units of execution that perform a variety of actions, such as storing data historically, synchronizing database values to OPC, or loading recipe values. A variety of group types, items types, and options means that Transaction Groups can be configured to accomplish almost any task.
Transaction groups are configured in the Ignition Designer. Each Transaction Group is associated with a table in a database Ignition is connected to, and is made up of one or more Items. The group will then execute at a specific interval of time, or on a user-defined schedule. Generally each execution will create a new row in the database table with a separate column for each Item in the group. However it is possible for some types of Transaction Groups to take values from the database and write to specific tags.
Additionally the Transaction Group can be configured to conditionally synchronize values by using a trigger. The trigger is evaluated every execution, and if the trigger condition is met, then synchronization will occur. If the trigger condition has not been met then the group will wait until the next execution to re-evaluate the trigger.
There are several types of Transaction Groups, (Standard, Block, Historical and Stored Procedure) and each offers different functionality. For example the Historical Group allows you to quickly configure a group that reads OPC data and push it to the database. While the additional flexibility of a Standard Group allows you take values from the database and write them to a PLC.
Transaction Groups allow you to perform tasks such as: database to OPC synchronization, recipe management, and historical data logging.
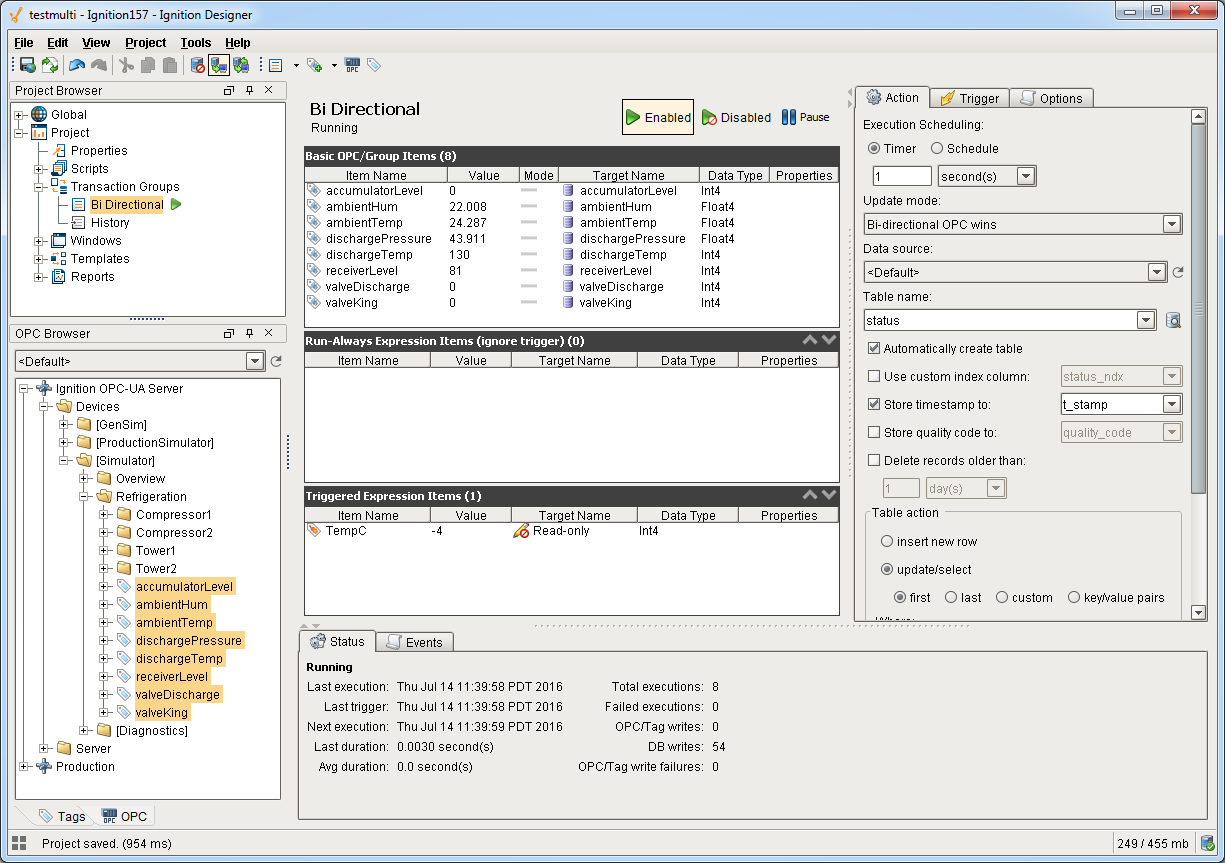
The Transaction Group Workspace
Transaction groups are edited through the Ignition Designer. When a group is selected, you are presented with the transaction group workspace.
The workspace is broken into several parts:
-
Title bar - Shows the name of the currently selected group, as well as options to set it as Enabled or Disable, and to Pause, if it's currently executing.
-
Item configuration - Shows all of the items configured in the selected group. Many settings can be modified directly through the display, the rest by double-clicking the item, or selecting "edit" in the context menu.
-
Action / Trigger / Options tabs - Define how and when a group executes. Holds most of the options that apply to the group in general, such as the update rate, and which data connection it uses.
-
Status / Events tabs - Provides information about the executing group, including the most recent messages that have been generated.
Items (Tags)
Each Item in the Transaction Group consists of several properties, but the key properties are the Value and Target Name.
-
Value: The Value can be a reference to an OPC value such as a tag in the Tag Browser. However you can instead use a direct OPC Item Path without having to create a tag in Ignition first. Additionally the Value can be derived using Ignition's Expression Language.
-
Target Name: In most cases the Target Name is a column on the database table the Transaction Group is associated with. However it is possible to have the Target Name 'Read-only'. When set to 'Read-only' the value of the item will not be tied to any columns in the database, but is still visible from the Transaction Group and can be used as a trigger.
Enabling Group Execution
In order for groups to be evaluated, they must first be enabled. This is done by selecting "enabled" in the group title bar, and then saving the project. The group executing can be stopped by reversing the procedure and selecting "disabled" before saving. If you want to quickly and temporarily stop the group's evaluation, toggle the "pause" button. This will prevent execution until the group is unpaused, or until the system is restarted.

Transaction Groups exist in a project, but they execute in the global Gateway space. This means that once your groups are enabled, they will run even without a client open.
Editing Group Settings
Group settings may be modified at any time, regardless of whether or not the group is executing. Modifications will be applied when the project is saved, and the group will be started or stopped as required. Some changes such as modifying items may cause features like live values to appear to be incorrect. It is therefore important to note the modified icon that appears next to the group, and to save often. If you would prefer to stop the group before making edits you can simply pause the group. Execution will begin again after the project is saved.
How Groups Execute
Generally speaking, groups work on a timer. They are set to run at a certain rate, and at that rate, then check the rest of the settings. If the trigger conditions pass, the group is executed fully. The following section provides a fuller outline of the execution cycle.
Execution Cycle
All of the groups follow a similar execution cycle. The core evaluation may differ, but the general cycle is the same.
-
Timer executes, group enters execution
-
Is the group paused? Break execution.
-
Is the Gateway part of a redundant pair? If so, is it active? If not active, break execution. Groups only execute on the active node.
-
Evaluate "run-always" items: OPC items, tag references, and Expression items set to ignore the trigger (or placed in the "run always" section of the configuration window).
-
Is trigger set/active? If there is a trigger defined, but it is not active, break execution.
-
Evaluate "triggered" expression items.
-
If applicable, read values from the database.
-
Execute a comparison between items and their targets.
-
Execute any writes to other Tags or the Database that result from execution.
-
Report alerts.
-
Acknowledge the trigger, if applicable.
-
Write handshake value, if applicable.
If an error occurs at any stage besides the last stage, execution will break and the failure handshake will be written if configured. The group will attempt execution again after the next update rate period.
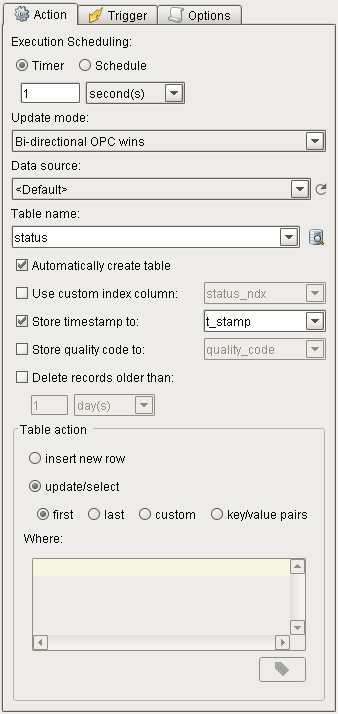
Action Settings
The action settings of a group define how often the group will be evaluated, as well as important settings that apply to the group as a whole.
They are found on the Action tab, the first of the tabs on the right side of the Transaction Group workspace.
Common Settings
The settings vary for the different types of groups, but a few setting are common to most of them:
|
|
|
|
Execution scheduling |
How often the group is evaluated. For a number of reasons, the group may not execute during the evaluation. The most common reason is the trigger, but see Execution Cycle above for more possible reasons why evaluation will exit. |
|
Data source |
The data connection to use for the group. Can be Default, which will use the default connection for the project. |
|
Update mode |
For groups that support it, sets the default for how items are compared to their targets. |
|
Store timestamp |
Stores a timestamp along with the data any time the group executes. |
|
Store quality code |
Stores an aggregate quality for the group along with the regular data. The aggregate quality is a bit-wise AND of the qualities of the items in the group. |
Execution Scheduling
There are two ways to specify when the group should execute: timer and schedule mode.
Timer Mode
In this mode, the group is evaluated regularly at the provided rate. As mentioned in the previous sections, due to trigger settings, full execution may not occur, but the trigger will at least be evaluated at this rate.
Schedule Mode
With schedule mode, you are providing a list of time (or time ranges) that the group should run at. If the pattern specified includes a time range, at rate must be provided, and the group will execute as in timer mode during that period.
The schedule pattern
The schedule is specified as a comma separated list of times or time ranges. You may use the following formats:
24-hour times. Ie. "8:00, 15:00, 21:00", for execution at 8am, 3pm, and 9pm.
12-hour with am/pm (if not specified, "12" is considered noon): "8am, 3pm, 9pm"
Ranges, "8am-11am, 3pm-5pm"
Notes
It is allowed for time ranges to span over midnight, such as "9pm - 8am"
When using ranges, the execution times will be aligned to the start time. For example, if you specify a schedule of "9am - 5pm" with a rate of "30 minutes", the group will execute at 9, 9:30, 10, etc., regardless of when it was started. This is a useful difference compared to the Timer Mode, which runs based on when the group was started. For example, if you wanted a group that ran every hour, on the hour, you could specify a 1 hour rate with a range of "0-24".
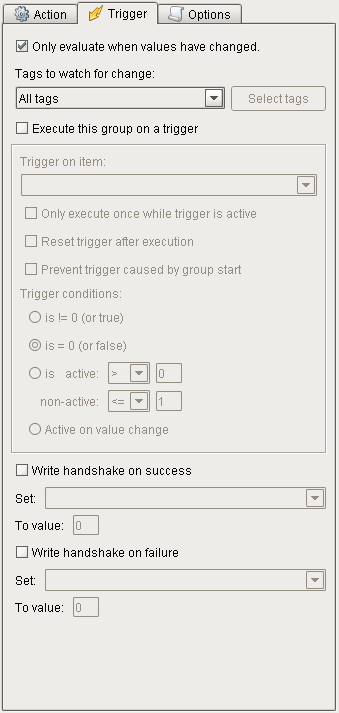
Trigger and Handshake Settings
The trigger settings determine when a group will actually execute. They are examined each time the group evaluates (according to the update rate of the group). If they pass, the group will run and perform its action against the database.
The trigger settings are the same for all group types. They are found on the second tab (labeled "Trigger"), in the right side of the Transaction Group workspace.
Only execute when value have changed (asynchronous trigger)
These settings are evaluated first. If set, the group will examine whether the values in the specified tags have changed, and if not, will exit evaluation.
It is possible to monitor all Run-Always tags in the group, or only specific ones.
Execute this group on a trigger
Enables trigger on a specific item in the group. The trigger item can be any Run-Always item, such as an OPC item, Tag reference, or an Expression item set to "Run-Always" mode.
In addition to the numeric settings that define the trigger, there are several other options:
-
Only execute once while trigger is active - The group will only execute once when the trigger goes into an active state, and will not execute again until the trigger goes inactive first. If unselected, the group will execute each time the trigger conditions evaluate to true.
-
Reset trigger after execution - If using the ">0" or "=0" trigger modes, the trigger can be set to write an opposite value after the group has executed successfully. This is useful for relaying the execution back to the PLC.
-
Prevent trigger caused by group start - If selected, the group will not execute if the trigger is active on the first evaluation of the group. In the course of designing a group, it is common to stop and start it many times, and sometimes it is not desirable to have the group execute as a result of this. Selecting this option will prevent these executions, as well as executions caused by system restarts.
Handshake Settings
Group handshakes are also defined on the trigger tab. It is possible to specify both a success and failure handshake. The success handshake will write the specified value to the given item when the group has finished all other triggered execution without error.
The failure handshake, on the other hand, will be written when the group execution is cut short due to an error, such as an error writing to the database or an item.
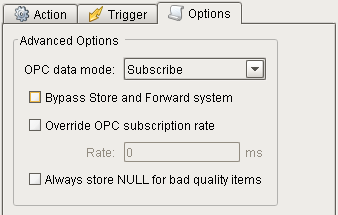
Advanced Settings
Transaction groups offer several advanced settings that affect how execution occurs. These settings can be found under the Options tab for a group.
OPC Data Mode
This setting modifies how the group receives data from OPC.
Subscribe - Data points are registered with the OPC server, and data is received by the group on-change. This is the default setting and generally offers the best performance, as it reduces unnecessary data flow and allows the OPC server to optimize reads. However, it's important to note that data is received by the group asynchronously, meaning that it can arrive at any time. When the group executes, it "snapshots" the last values received and uses those during evaluation. If some values arrive after execution begins, they will not be used until the following execution cycle.
Read - Each time the group executes it will first read the values of OPC items from the server. This operation takes more time and involves more overhead than subscribed evaluation, but ensures that all values are updated together with the latest values. It is therefore commonly used with batching situations, where all of the data depends on each other and must be updated together. It's worth noting that when using an OPC item as the trigger, the item will be subscribed, and the rest of the values read when the trigger condition occurs. Note: This option was previously referred to as "polled reads" in earlier versions of the software.
Bypass Store and Forward System
Only applicable to groups that insert rows into the database. Causes groups to target the database directly instead of going through the store-and-forward system. If the connection becomes unavailable, the group will report errors instead of logging data to the cache.
Override OPC Subscription Rate
Specifies the rate at which OPC items in the group will be subscribed. These items are normally subscribed at the rate of the group, but by modifying this setting it is possible to request updates at a faster or slower rate.
Creating a Transaction Group
Transaction groups are used to store history, log events, synchronize databases tables with PLC, perform calculations, and many more data-centric tasks.
To create a Transaction Group
Let's create a basic History Group and start logging some PLC values to your database.
-
Click on the Transaction Groups in the Project Browser panel to switch the Designer's workspace to the Transaction Group workspace.
-
Click on File > New > New Standard Group to make a new Historical Group.
Your new group, named Group will be selected. The OPC Browser panel is now docked to the lower-left of the screen. -
Browse your OPC device and drag some OPC tags to the Basic OPC/Group Items section.
Your group starts out disabled by default. -
Click the Enabled button above the item tables to enable logging.
-
Go to the Action tab and change the Table Name in your table to something interesting.
Right now your group only exists in the Designer. -
Save the project to start the group.
Your group is now running and logging data to your database connection. To see the data, you can use the Ignition Designer's built-in database query browser. The easiest way to do this is to click on the Query Browser ( ) button to the right of your group's Table Name field. The Query Browser is a convenient way to directly query your database connection without leaving the Ignition Designer. Of course - you can also use any query browser tools that came with your database.
Similar Topics ...
In This Section ...