Parameterized Popup Window and UDTs
A parameterized popup window lets you pass information from one window to another window. You can make a single popup window, change what it does and what it points to from a parameter(s) that gets passed into the receiving window using Custom properties. Parameterized popup windows can use basic Tag types and UDTs. Parameterized popup windows can be re-used as long as the proper information is passed into the popup window.
Before we dive into Parameterized Popup Window and UDTs, a small Glossary of terms is provided to help you understand the terminology on this page.
Glossary
|
Name |
Description |
|
A property you add to a component or container. A custom property is a variable that you customize for your particular use. |
|
|
Is a data structure made up of Tags, attributes and settings. UDTs can be used in any place a standard Tag is used, and are used to design re-usable, parameterized, and extendable data types. |
|
|
An individual value inside of a Custom Property, assuming the Custom Property is a UDT type. |
UDT and matching Tank Template must be created to do this exercise
The examples in this section assume you have a UDT and matching Tank template (that uses the UDT) created. To learn more about creating UDTs and Templates go to UDT Parameter and Template Basics sections of this user manual.
To pass a UDT to a popup window
When you pass an entire UDT into a popup window, you can take advantage of passing all the parameters inside of that UDT at once. By passing the entire UDT, you have every single value available to you that is inside the UDT.
-
In this example, we have a 'Tank Detail' popup window with a data type called 'Tank.'
On the root container, right click and select Customizers > Custom Properties.
Click the plus icon and add a property called 'passIn_TankData' and select the 'Tank' data type from the dropdown list.
Click OK. Note: parameters that are passed into a window can only be passed into properties that are on the Root Container.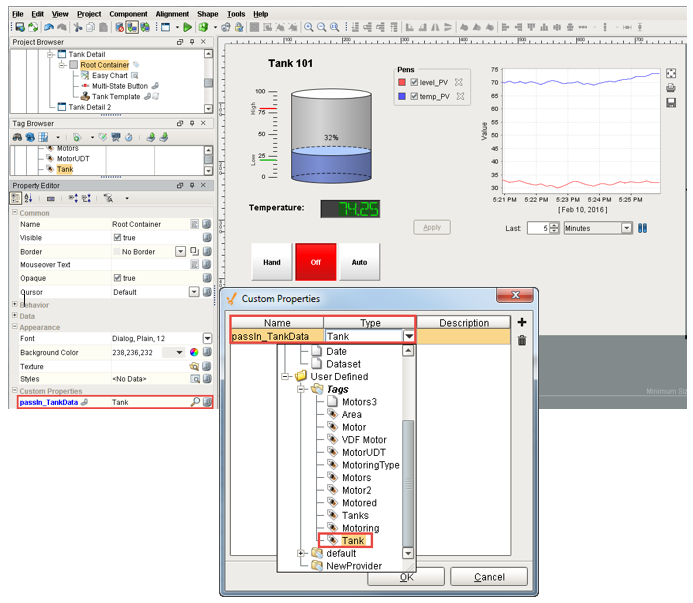
-
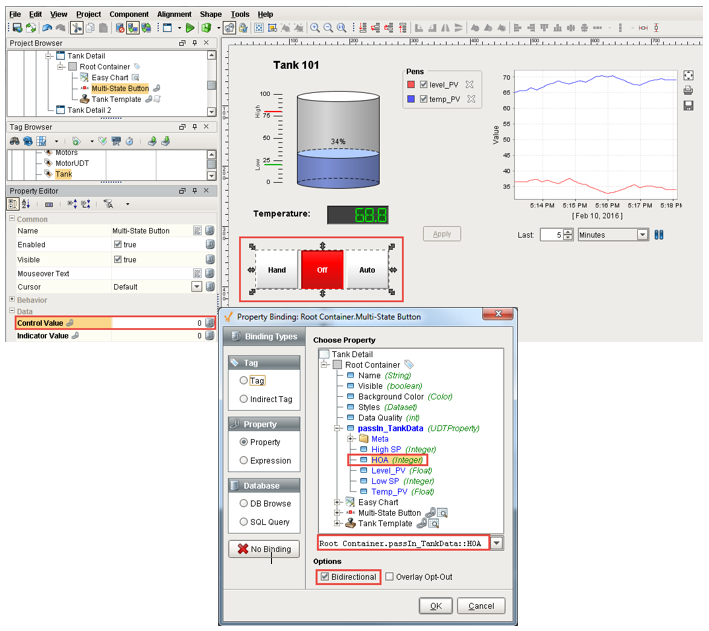
In the Property Editor you will see the Custom Property called 'passIn_TankData.' It is assigned a unique name so it is clear exactly what the Tank property is doing. It will hold the UDT that is passed in from another window.
Click on the magnifying glass and see all the elements that are inside of the Tank UDT; (i.e., HOA, level_PV, temp_PV, etc.). All of the values will be NULL if you just added the property, They will get filled in later when tested in preview mode.
-
Now, you can bind components inside the Tank Detail window to elements of the Tank UDT.
For example, let’s bind the HOA Control. Click on the Multi-state Button in your Tank Detail window.
In the Property Editor, click the binding icon next to the Control Value to open the Property Binding window.
Select the HOA property of the Tank UDT and check the Bidirectional box to make it bidirectional.
Click OK.By using the entire Tank UDT and all of its parameters, you have all the properties available to you making it very easy to configure the components in this popup window. You can now bind properties on the window without having to use indirect tag bindings. Bind the rest of your components to the appropriate Tags in the Root Container UDT.
-
Now that there is a property to pass into, we need to set up the script to pass a Tank UDT into the Tank Detail window. A great place to do this is from the Tank template definition. The Tank template is using the same parameter as the Tank Detail window, but for clarity, it was assigned a unique name called ‘template_TankData.'
-
Navigate to your Tank Template and right click on the gray area of the canvas and scroll down to Scripting.
Under Event Handler, select 'mouseClicked.' -
In the Navigation tab, click Open / Swap, Open and Center and under the Window dropdown, select your ‘Tank Detail' window.
Check the Pass Parameters box. Press the green plus icon to add a row and click in the 'Parameter Name' cell. This is a dropdown list that shows all of the custom properties on the Root Container of the selected window. Select the 'passIn_TankData' parameter to pass in to.
Note: If you don't see this parameter, you either have the wrong window selected, or you did not add the property to the Root Container. -
Select the whole row and click the choose property link icon and select the 'template_TankData' property. The is the value we are passing to the window.
-
Click OK. Save and Publish your project.

-
-
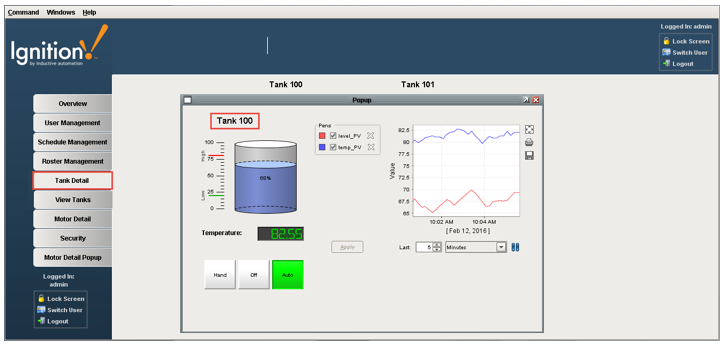
Open the Runtime and go to any window that uses your tank template. We used the exact same UDT that is in the Tank template and passed it to the Tank Detail Popup window.
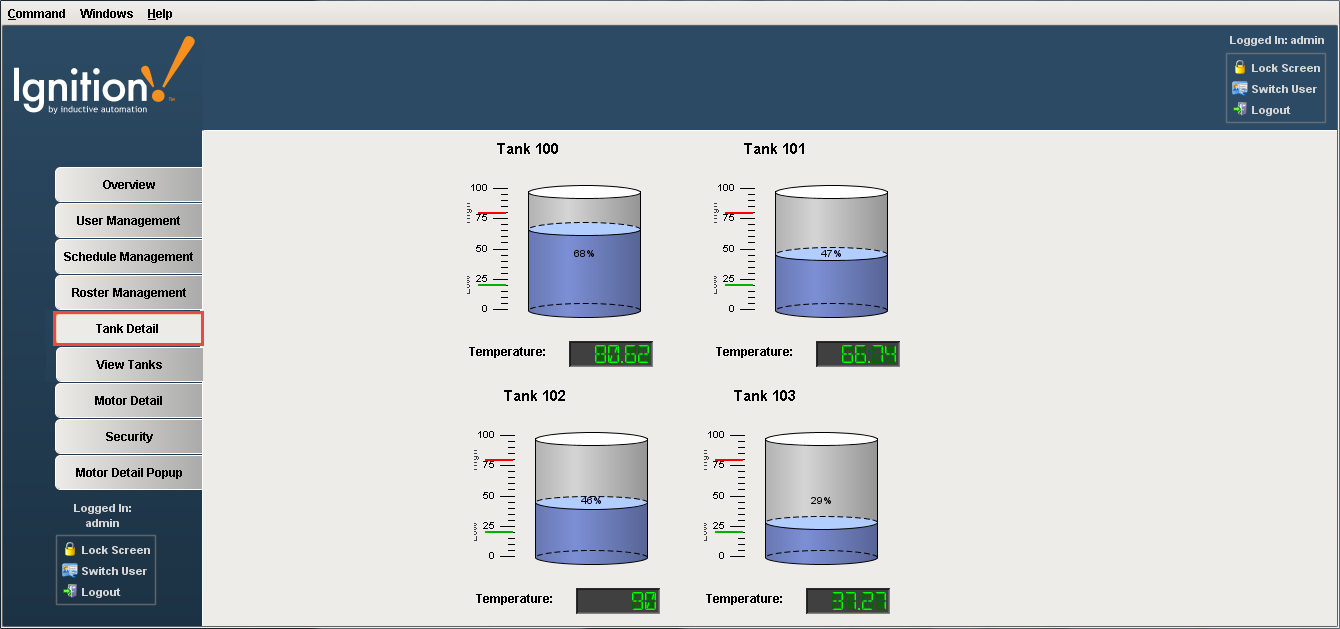
Click on one of the Tanks (ie: Tank 100) and it will open your Tank Details window and display all the details about Tank 100. You can do this with any Tank in your runtime.
Similar Topics ...