Alarm Status - Row Styles
The Alarm Status Table comes with a particular set of colors associated with each of the alarm states. You can change these colors for each of the states by going to the Alarms Row Styles Customizer that the Alarm Status Table component provides.
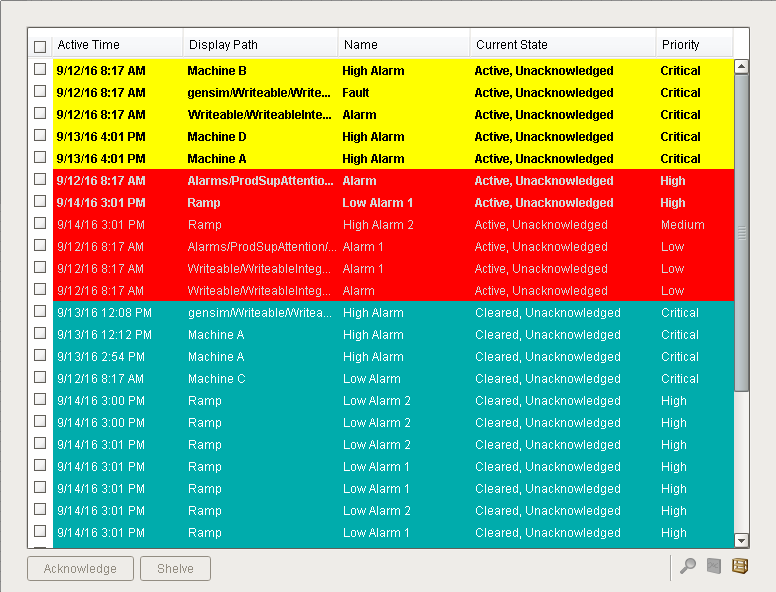
By default, the Active and Unacknowledged alarms are at the very top of the table and are red and blinking, and Cleared and Unacknowledged alarms are teal and at the bottom of the table, as shown in the example below.
Customizing Alarm Row Styles
In the Alarm Row Styles Customizer is where you can modify an existing style, add more styles, or delete a style. Each style has an expression, a color and if you want it to blink. The expression allows you to do any evaluation you want using any parts of the alarm: Priority, State, Display Path, Active Time, Clear Time, and many more.
-
In the Designer, right click on the Alarm Status Table component, go to Customizers > Alarm Row Styles. The Alarm Row Styles window will appear displaying the default row styles.
Alarm Row Styles is an ordered list and each style has an expression. How it works is, the first style that returns ‘True’ for a given alarm is the one that is going to be used, so you want to make sure the order is the correct order that you want. Click on each of the row styles to view the expression and row style.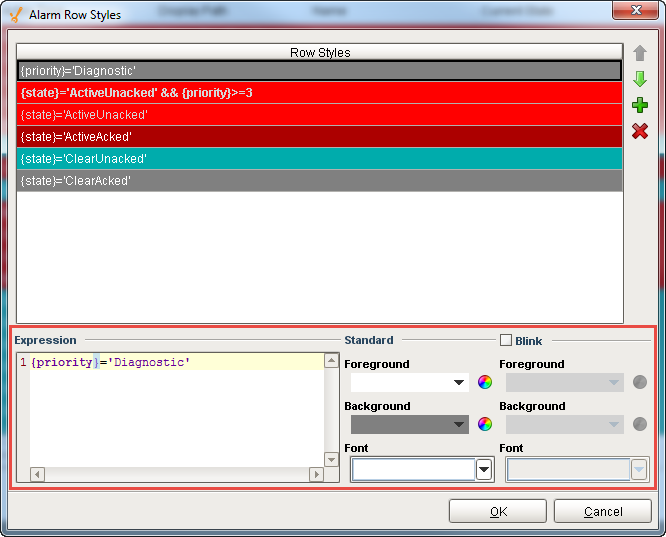
-
Let's create another state alarm called 'ActiveUnacked' and make it 'Critical.' Set this new expression to return 'True' or 'False.' You can copy and paste the expression from the 'ActiveUnacked' state with a priority =3 (i.e., second style row) to create your new expression.
-
Click on the green plus icon
 .
. -
Enter or paste your new expression. Change the priority from '3' to '4.'
Active and Unacknowledged Critical alarm expression{state}='ActiveUnacked'&& {priority}>=4Priority Names and Numbers
Priorities are numbered behind the scenes, but named when you are creating them. 0 = Diagnostic, 1 = Low, 2 = Medium, 3 = High, and 4 = Critical. This allows you to use operations like '>=' (greater than or equal) when filtering on priority.
-
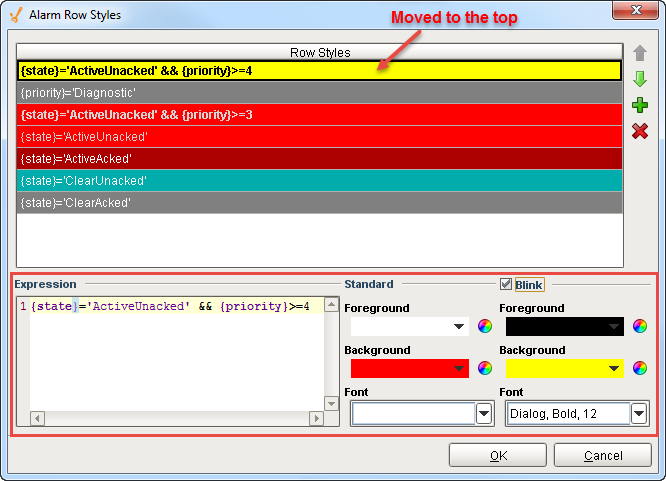
Because this is a critical alarm, you want it to catch the operator’s attention, so it’s a good idea to make the style standout. Make the foreground color 'white' and the background color 'red.' Check the blink box and make the foreground color 'black' and background color 'yellow.'
-
Style order is important, so if you keep this style at the bottom of the list, the alarm will never be visible to the operator because the first state to return ‘True’ is ActiveUnacked with a Priority >= 3. Move ActiveUnacked with a Priority >= 4 to the top of the row styles list, so it is evaluated before the other styles.
-
Press OK.
-
-
The critical alarms will now blink red and yellow and will definitely catch the operator’s attention.
To learn more about states and priorities, including all the alarm configuration properties, refer to the sections on Alarm Properties and Event Reference.
Similar Topics ...