Configuring Alarms
Alarms are defined on Tags or OPC items in Data Bridge (Transaction Groups). Each alarm is a condition that will be evaluated when the value of the Tag changes. When the condition becomes true, the alarm is said to be active. When it becomes false, the alarm is said to be clear.
Alarms may also be acknowledged. This flags the alarm as such in Ignition, and the acknowledgment state of each alarm can be made visible throughout Ignition. In practice, acknowledgment allows users to 'claim' alarms, or otherwise let colleagues know that the alarm is being handled. Until an alarm has been acknowledged, it is said to be unacknowledged, or 'unacked'.
Configuring an Alarm on a Tag
-
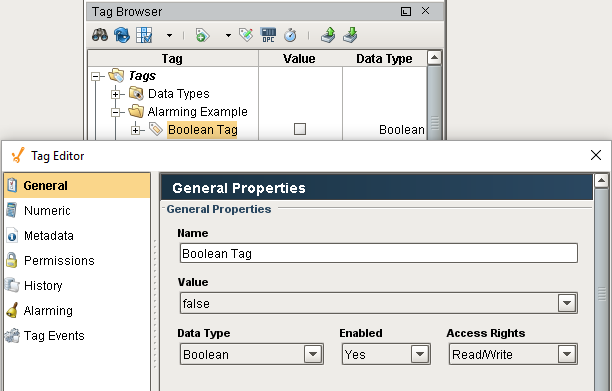
Double-click on the Tag to edit it. The Tag Editor window will appear. For this example, a Memory Tag with a Data Type of Boolean will be used.
-
On the left side of the window, click on Alarming
-
Either click the green plus sign + towards the bottom of the window, or double click the
 item to add a New Alarm to the Tag.
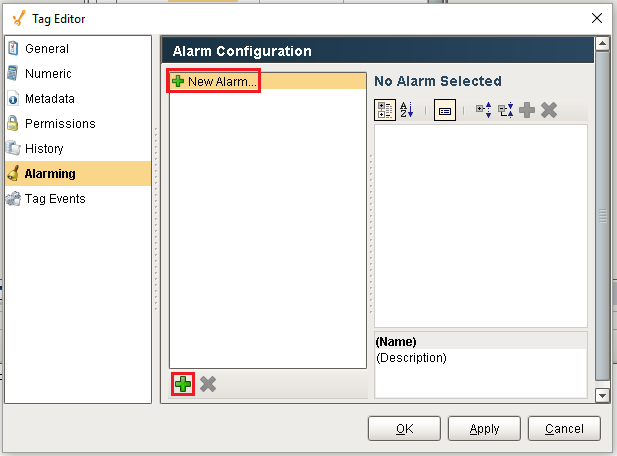
-
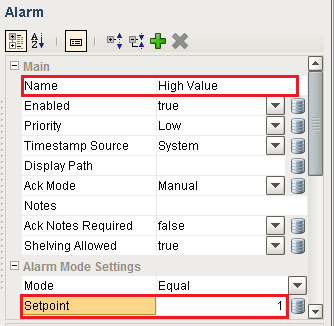
Enter a Name for the Alarm and set any other settings you wish. In the image below the Name was changed to "High Value" and the Setpoint was changed to 1. This means that when the value on the Tag is equal to 1 (or True in the case of a boolean) then the alarm will become active.
-
Click OK to commit the new alarm.
-
Ignition will start monitoring the alarm immediately. Note the alarm icon
 next to the Tag. This means that at least one alarm is configured on this Tag.
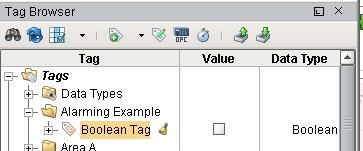
Multiple Alarms on a Single Tag
Tags can have multiple alarms configured, each with unique setpoints and other configurations. The number of alarms that you can configure is virtually unlimited and will never exceed the bounds of reasonable design consideration. Adding additional alarms is just as easy as adding the first: simply click on the green plus sign + and start configuring the new alarm. This way separate alarms can monitor different setpoints, so Tags can have alarms for high and low setpoints.
Tip
Alarms can be copied and pasted with keyboard shortcuts. Select an alarm from the Tag Editor, press Ctrl-C to copy, and Ctrl-V to paste. Alarms with similar configurations can rapidly be replicated to hasten development.
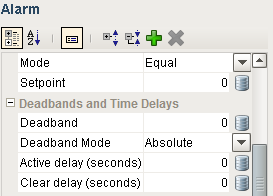
Alarm Settings
Similar in concept to properties on Vision components, alarm settings, also known as alarm properties, allow you to modify the behavior of each alarm.
For example, in some situations a Tag may frequently enter and leave an alarm state, but only for a brief moment. Normally an alarm would be generated each time the alarm condition was met, but the Active Delay attribute will prevent any alarms from being generated until the value on the Tag has stayed in an alarm state for a set period of time.
Descriptions of each attribute can be found on the Alarm Properties and Event Reference page.
Bindings
Many alarm properties are bind-able, which means they can be bound to other Tags in the system, or expressions. For example, you might bind the enabled property to another Tag which represents whether or not your process is running, thereby disabling the alarm when production is stopped. Or, you might bind the setpoint of an alarm to a Tag that operators can manipulate, thereby letting the setpoint be changed at runtime.
To bind an alarm property, simply click on the binding icon ![]() , and the binding UI will slide in from the right. From here you can select the binding type (No Binding, Tag, Expression, or UDT Parameter, if applicable). Note that the expression can reference many useful values such as the Tag's value and other settings of the alarm. When you've configured the binding to your liking, click on the "Back" link at the top of the screen.
, and the binding UI will slide in from the right. From here you can select the binding type (No Binding, Tag, Expression, or UDT Parameter, if applicable). Note that the expression can reference many useful values such as the Tag's value and other settings of the alarm. When you've configured the binding to your liking, click on the "Back" link at the top of the screen.
Associated Data
Alarms can be configured with custom data, known as Associated Data. These values can be static, driven by another tag, or evaluated with an expression. Associated Data can be viewed in real-time, and is recorded in the Alarm Journal system.
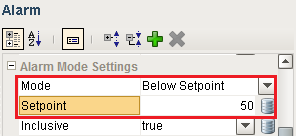
Modes and Setpoints
Each alarm is configured with one of many Modes, and usually one or more Setpoints. Modes determine the method in which alarm activity is evaluated, while Setpoints are the thresholds or limits that determine when a Tag is within the alarm state. Both properties work in together to determine when alarms become active, as well as cleared.
For example, when Mode is set to Below Setpoint, the Setpoint attribute is compared to the Tag's value. If the Tag value is less than the Setpoint value, the alarm becomes active. Once the value of the Tag is greater than the Setpoint value, the alarm will transition to a cleared state.
Alarming on Individual Bits
Additionally, alarms can become active by bit state. A common practice for PLC programming is to store alarm conditions as series of bits inside the PLC and expose them to the world as an integer value. Each bit is essentially a binary value. A series of 8 bits, for example, could be represented as an 8-bit integer. This integer value can be monitored by Ignition's OPC-UA server as an integer value as a Tag. This Tag can then have as many alarms as the integer has bits by monitoring the integer's bit state. Using the Bit Position Mode, multiple alarms in Ignition can be configured to monitor the state of each bit.
The following table shows binary and decimal equivalents:
|
Binary |
Decimal |
|
10001110 |
142 |
In this case the Tag would be an integer with a value of 142. This Tag would have eight alarms. Each one of these alarms become active in accordance with its Boolean value.
To create the alarms on an integer Tag value
-
Edit the Tag that has an integer value.
-
Create an alarm by selecting the Alarming tab and clicking the green plus sign + to add an alarm.
-
Complete the appropriate properties, for example, enter the Name of the alarm.
-
From the Mode section drop-down, select Bit State and enter a value for the Bit Position.
-
Repeat the same process for the remainder of the bits.
Mode Reference
A list of all available Modes can be found on the Alarm Properties and Event Reference page.
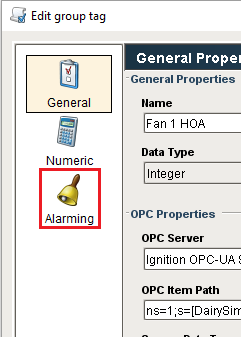
Alarms in Transaction Groups
Alarms can also be added to OPC items in Transaction Groups. This means alarms can be used without ever creating a Tag in Ignition. Simply edit an OPC item, and an Alarming section will appear on the side of the Edit Group Tag window. From here adding an alarm to the item is similar to adding an alarm to an Ignition Tag.
In This Section ...