Custom Email, SMS, and Voice Scripts
Introduction
Ignition has a built-in script that it uses when it sends out an alarm notification via Email, SMS, and Voice. There is a different script for each notification type. Each notification type has it's own relevant properties for configuration, although, some features are common to all profile types that you will soon discover.
Email, SMS and Voice scripts in Ignition are extremely easy to use and setup. Before you begin using alarm notifications and customizing message scripts, you need to have Email, SMS and Voice modules installed, alarm notification profiles created, and settings configured. It's best to run through these alarm notification requirements before setting up your custom scripts so you have a smooth implementation of alarm notifications. You only need to install the modules and the profiles that you plan to use.
Alarm Notification Modules
The following modules can be found on the Ignition Downloads page.
-
Email Notification Module
-
SMS Notification Module
-
Voice Notification Module
-
Text-to-Speech Voice (language)
Alarm Notification Profiles
Refer to each alarm notification profile below for how to create and modify a profile.
-
Email Notification Profile - Two-Way Acknowledgement is enabled here if you want users who receive the alarm to acknowledge the alarm.
-
SMS Notification Profile - Two-Way Acknowledgement is enabled here.
-
Voice Notification Profile - Acknowledgement of the alarm is part of the call script, and provided as an instruction as part of the call.
-
User Profile - when setting up a Voice alarm notification, each user's profile requires a contact telephone number and a Security PIN.
Alarm Notification Pipelines
-
Alarm Notification Pipelines - controls how alarm notifications are sent out.
Notification Roster
-
On-Call Rosters - are the group of users that will receive the alarm notifications. On-Call Rosters are available in the Contacts tab of the Notification Block.
You can configure and customize scripts for Email, SMS and Voice in two locations; in the Alarm Configuration section of the Tag Editor, and in the Notification Block of the alarm pipeline.
Things to know about the Pipeline Notification Block
Every Notification Block in a pipeline has to have a message to send out. Here you have all the alarm properties to select from to build and test your script. You can specify your Contacts, and enable Consolidation all from the same screen.
Things to know about using the Alarm Configuration in the Tag Editor
The Alarm Configuration has fields to override the message sent from a Pipeline's Notification Block. This is particularly useful if your alarm has a dynamic Pipeline or is being sent to multiple Pipelines. If you're creating your alarm notification for the first time, make sure to specify a Pipeline for the alarm to use.
The alarm's Custom Message property takes precedence over any Notification Block in a pipeline.
Methods of Sending Notifications
There are two methods of sending out alarm notifications: one notification per alarm, and notification consolidation (i.e., multiple alarms in a single Email or SMS). By default, alarm notifications are sent out one message for each alarm.
If you want to use Consolidation, you can use the default Consolidated Message script or create a custom script using the alarm properties. Consolidation is enabled in the Notification Block. When enabled, multiple alarm events are sent together in one message.
Default Message Scripts
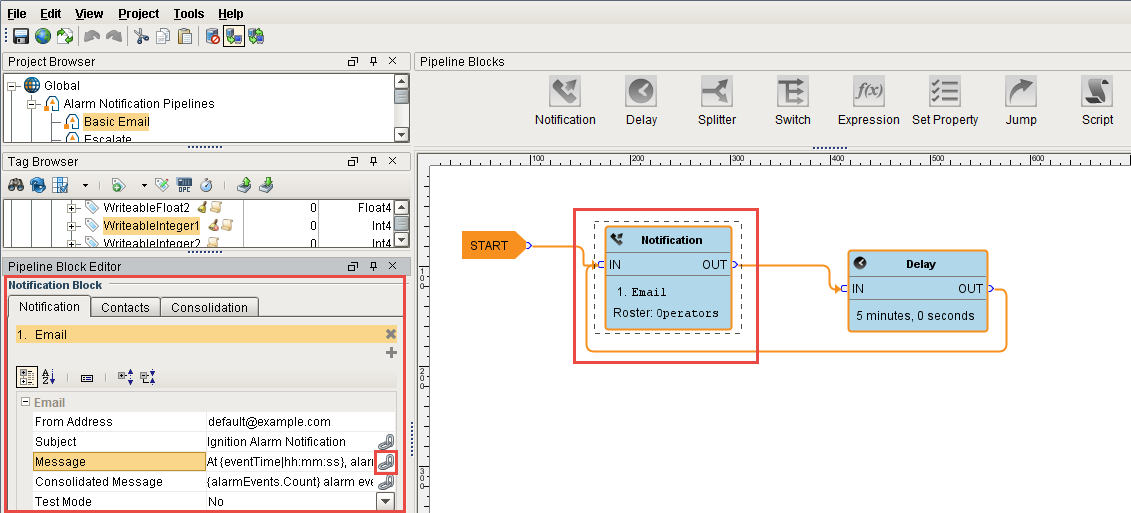
Each alarm notification type has a default message script. The Email and SMS default message script is found in the Notification Block shown below. For Voice, the default call script is located in the Voice Notification Profile.
At {eventTime|hh:mm:ss}, alarm "{name}" at"{displayPath}" transitioned to {eventState}You can override the default message script on a per alarm basis by simply creating a Custom Message script.
Custom Message always takes precedence over the default message
All alarm notification types allow you to define a custom message. If a custom message is created, it will be used instead of the default message in the script.
Custom Message Scripts
The following sections describe how to use the default message scripts, build your own custom message scripts, and send out alarm notifications for Email, SMS, and Voice.
Email notifications are the most common method of sending alarm notifications.
Customizing Email Message Scripts using Alarm Configuration in the Tag Editor
-
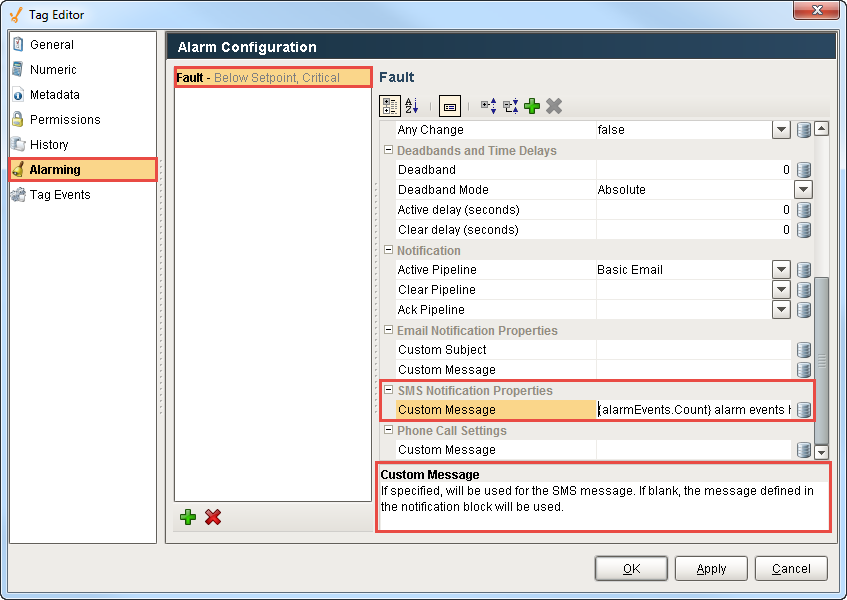
To customize an Email alarm notification, select your tag, and go to the Alarm Configuration screen. Scroll down and you will see several sections; Notifications, Email Notification Properties, SMS Notification Properties, and Phone Call Settings.
-
In the Notification section, you can specify the name of the alarm pipeline that you want to trigger when an alarm becomes Active, Cleared and Acknowledged. Simply enter the name of the alarm pipeline next to the relevant state you want the email sent out from. This example uses the ‘Basic Email’ pipeline, and the alarm is triggered on the 'Active' state.
-
Enter a Custom Subject called ‘Ignition Alarm.’
-
Create your Custom Message. You can use static text, bring in tag values and special alarm properties. You can even bind a particular property to an expression to concatenate a string that using other values that are in the system. This example displays the alarm name, state, and time in hours, minutes, and seconds.
Custom Message ScriptThe"{name}"alarm became {eventState} at {eventTime|hh:mm:ss} with a value of"{Value}"Notice that when you select any fields in the Alarm Configuration, the Description Area at the bottom of the window displays details about the property's behavior.
-
When complete, press Save.

-
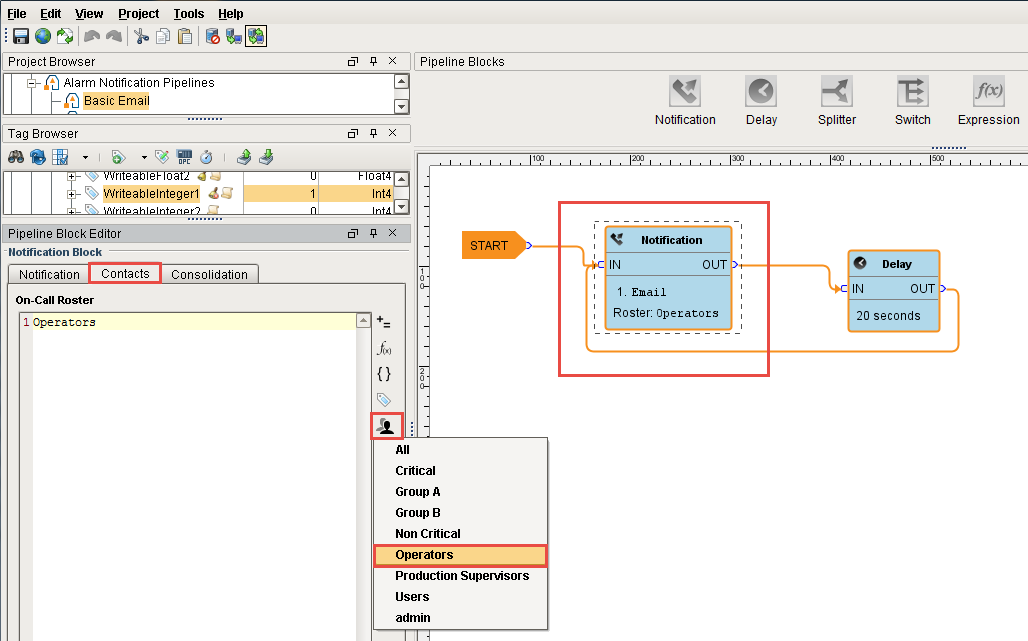
In the Pipeline Notification Block, go to the Contacts tab, and select the On-Call Roster that you want to send alarm notifications too.
-
If Consolidation is required, enable Consolidation and edit the Delay and Frequency settings. For more information on the Delay and Frequency settings, refer to Consolidation.
Customizing Email Message Scripts using the Pipeline Notification Block
-
Click on the Notification Block of your pipeline, and choose Email. You can see all the default Email settings for each field in the Notification Block. Click on the Link icon next to the Message field to expand the script.
-
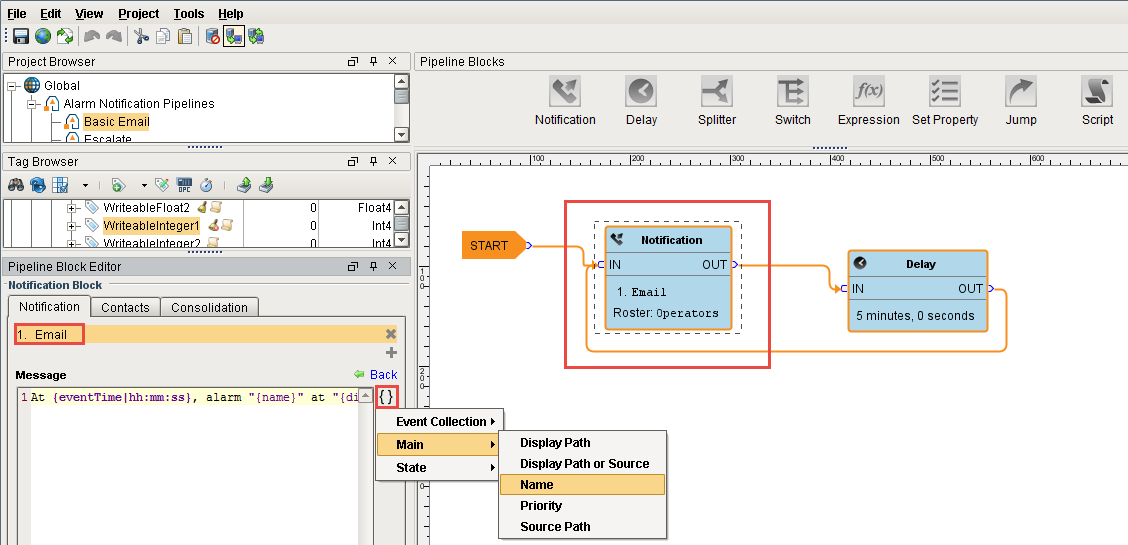
Here you can customize the default message script using the built-in alarm properties. Click on the Curly Braces icon to see a list of properties to help you build your custom message script.
-
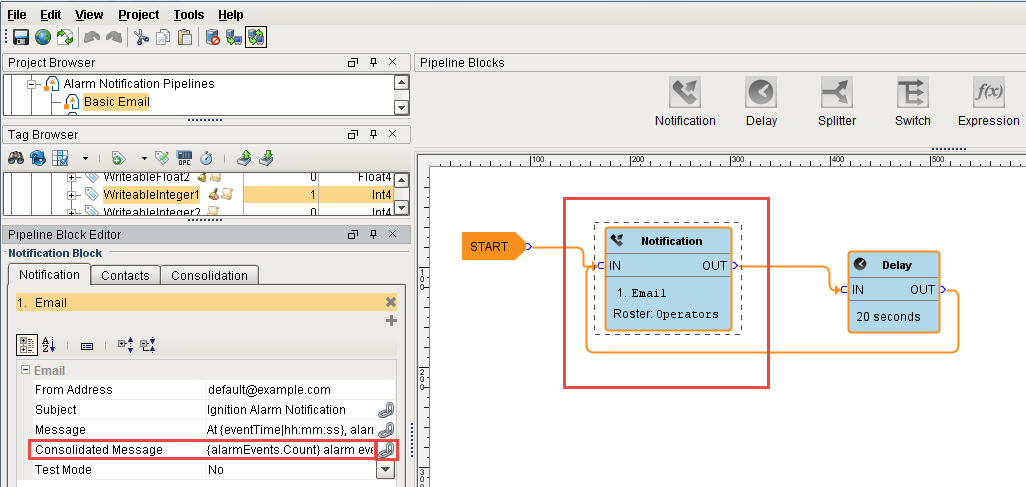
If you want to use Consolidation, you can use the default Consolidated Message script or create a custom script using the alarm properties. Click on the Link icon to expand the Consolidated Message script.
-
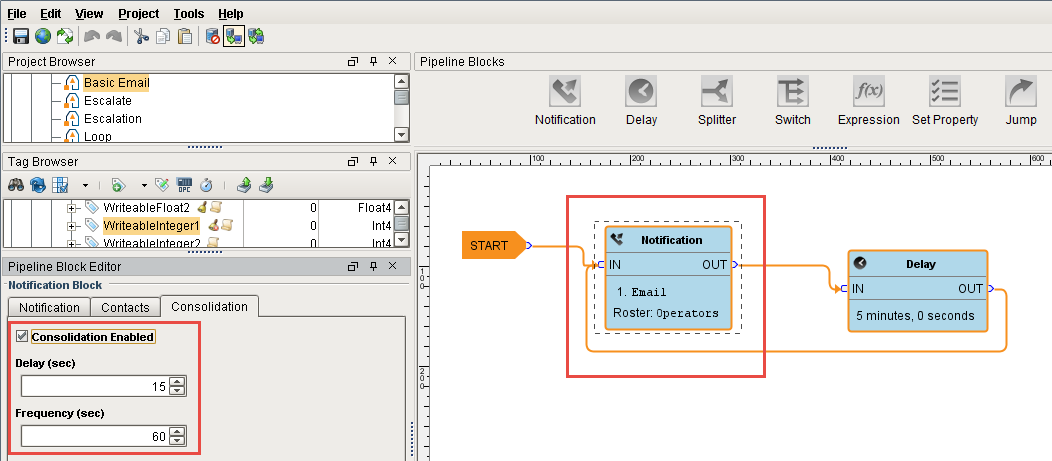
If required, go to the Consolidation tab, and enable Consolidation. When enabled, multiple alarm events are sent together in one email which results in fewer messages being sent out. For more information on the Delay and Frequency settings, refer to Consolidation.
-
Next, from the Contacts tab, choose the On-Call Roster that you want to send email notifications too.
SMS
SMS works the same way as Email except for a few subtle differences.
Customizing SMS Message Scripts in the Alarm Configuration of the Tag Editor
-
To customize an SMS alarm notification, select your tag, and go to the Alarm Configuration. Scroll down to SMS Notification Properties.
-
In the Notification section, specify the name of the alarm pipeline that you want to use when the alarm becomes Active, Cleared and Acknowledged. In this example, the name of the pipeline is ‘Basic Email’ and is triggered on the 'Active' state.
-
Enter your Custom Message script or use the default script. You will notice there is no Subject, only a Custom Message.
-
When you're finished customizing the alarm configuration, click Save.
-
Go to the Pipeline Notification Block and from the Contacts tab, choose the On-Call Roster that you want to send alarm notifications too.
-
If required, go to the Consolidation tab, and enable Consolidation. You can use the default Consolidated Message script or customize the script. Set the Delay and Frequency settings.
Customizing SMS Message Scripts in the Pipeline Notification Block
Another way to customize the default SMS alarm notification is to build your custom message in the Pipeline Notification Block.
-
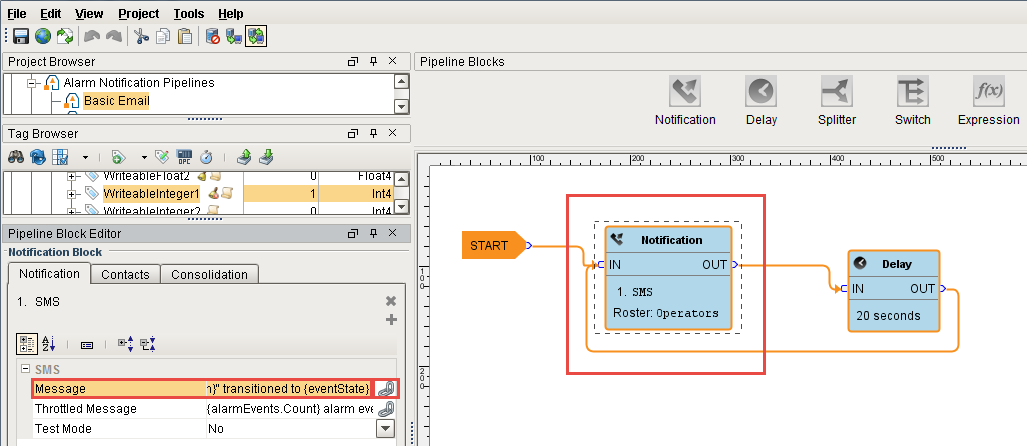
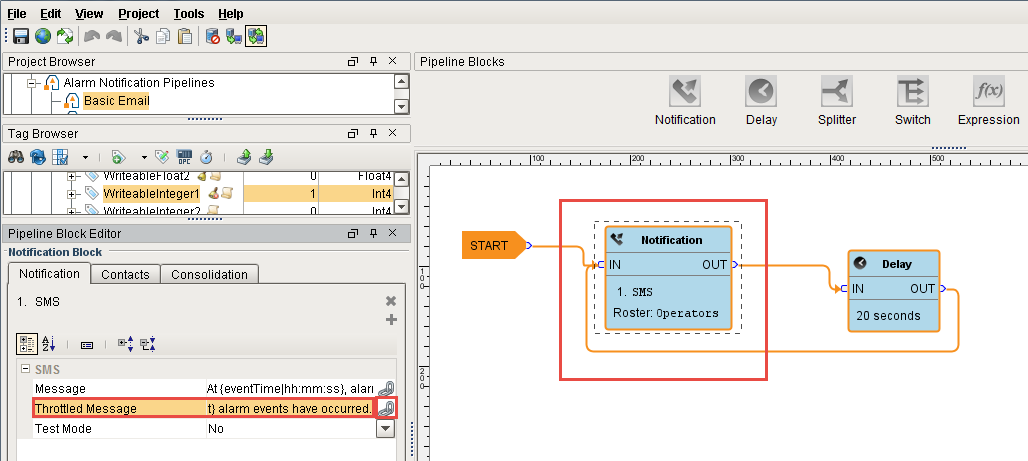
Click on the Notification Block of your pipeline, and choose SMS. You can see all the default SMS settings in the Notification Block. Click on the Message link icon to expand the script.
-
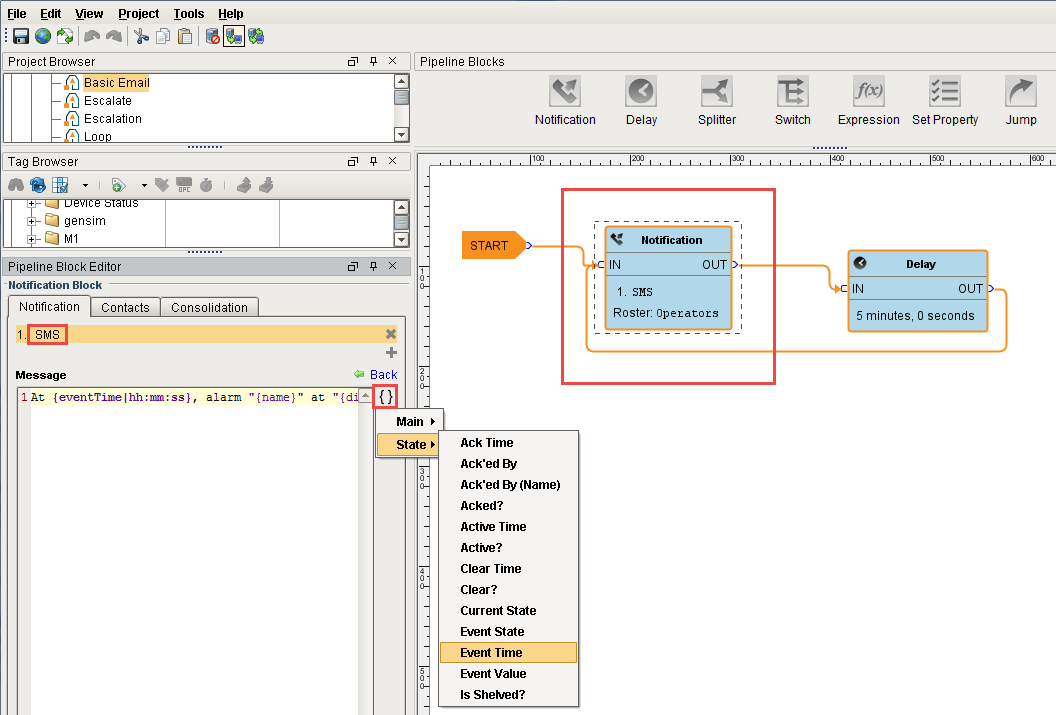
You can either use the default message script or customize one using the alarm properties. Click on the Curly Braces to see a list of available properties.
-
Like Email, use the Consolidated Message when multiple alarm events are sent together. In SMS, click on the Throttled Message link icon to expand the consolidated script. You can either use the default script or create your own custom message using the alarm properties.
-
From the Contacts tab, choose the On-Call Roster that you want to send alarm notifications too.
-
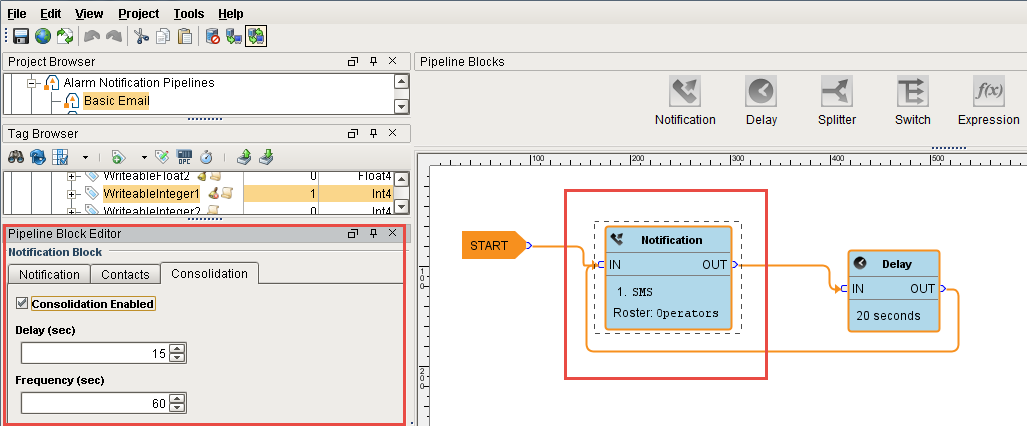
If required, go to the Consolidation tab, and enable Consolidation. Enter your Delay and Frequency settings.
Voice
The Voice Notification Module lets you deliver alarm notifications to users via telephone.
SIP and VOIP
Voice calls are delivered through any SIP compatible phone system. No dedicated hardware is required. Using a hosted service like Skype is the quickest way to implement the Voice Notification Module. For more information on how to configure any SIP compatible phone system, refer to the Voice Notification Profile.
Voice Call Script
The voice message played to the the user during the phone call is defined in the call script which is located in the Voice Notification Profile. The voice message is built off a message template that can reference properties in the alarm. Be aware that the voice message is shared across all voice notification profiles. If you define a custom message, it will be used instead of the default message in the call script.
The default call message template is shown below.
Configuring the Voice Call Script
The Voice Notification system is primarily accessed through the Notification Block. The only settings you can configure in the Alarm Configuration section is the Custom Message, and the Alarm Pipeline which defines what state you want to trigger the alarm. All Voice settings that you need to configure are in the Notification Block.
-
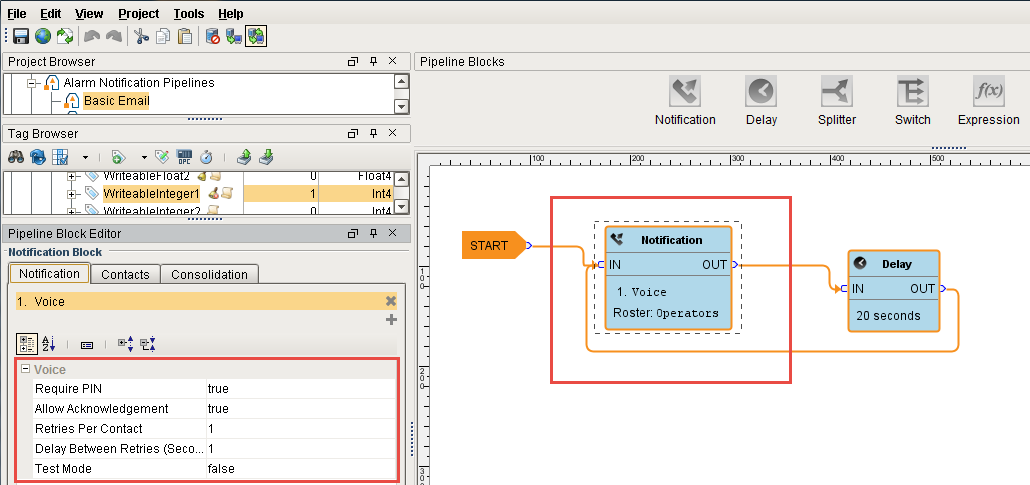
Click on the Notification Block of your pipeline, and choose Voice.
-
Configure each setting for your Voice alarm notification, as required.
-
PIN Required - If required, the user will need a PIN to hear the alarm notification. PINs are defined in the user's profile.
-
Allow Acknowledgement - If Acknowledgement is not required, users will only be allowed to listen to an alarm and not acknowledge them.
-
Retries per Contact - Number attempts to contact user by phone.
-
Delay between Calls - Creates a delay between each contact for each alarm. For most phone systems, a delay of 1 second is recommended.
-
Test Mode - If enabled, messages will be logged to the console indicating when and to whom calls would have been made without actually making a call.
-
-
This example shows how you might configure your Voice settings, but it depends primarily on your business requirements.
-
PIN Required - True
-
Allow Acknowledgement - True
-
Retries per contact - 1
-
Delay between Calls - 1
-
Test Mode - false
-
-
From the Contacts tab, specify your On-Call Roster. Users in the Voice On-Call Roster must have a telephone number, and an established PIN in their user profile.
-
Voice notification supports message consolidation. If required, enable Consolidation and enter Delay and Frequency settings.
Next...
-
User Pin for Voice