Navigation - Tab Strip
The Tab Strip is a simple navigation strategy used for small project structures having only a few windows. It allows users to see all the navigation tabs on the first screen of the runtime. It is most commonly used in a docked window to provide automatic window navigation. The Tab Strip works by clicking on a tab to swap one main window for another. The Tab Strip has two navigation modes:
-
Swap Windows - the tab strip automatically calls system.nav.swapTo() with the name of the selected tab for easy navigation from one window to another.
-
Disabled - the tab strip doesn't do anything when a tab is pressed. Users can customize tabs using property bindings or by responding to the propertyChange scripting event.
For a simple product structure, it's common to use the Tab Strip to navigate a project in Ignition.
To configure the Tab Strip in the Designer
-
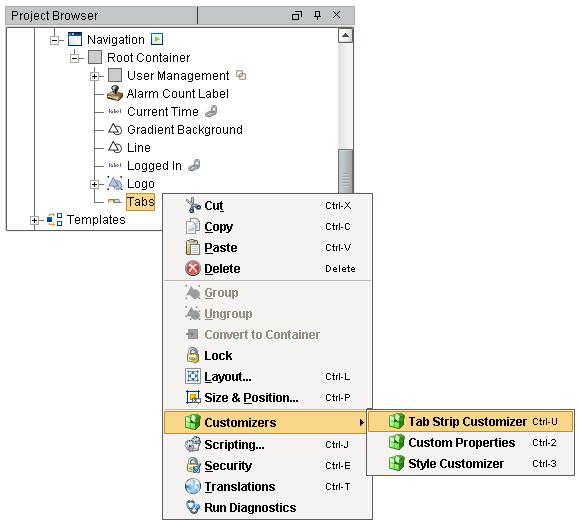
Go to the Project Browser, expand the Navigation window, to see the Tabs component inside of it.
-
Right-click on the tab component, choose Customizers > Tab Strip Customizer.
-
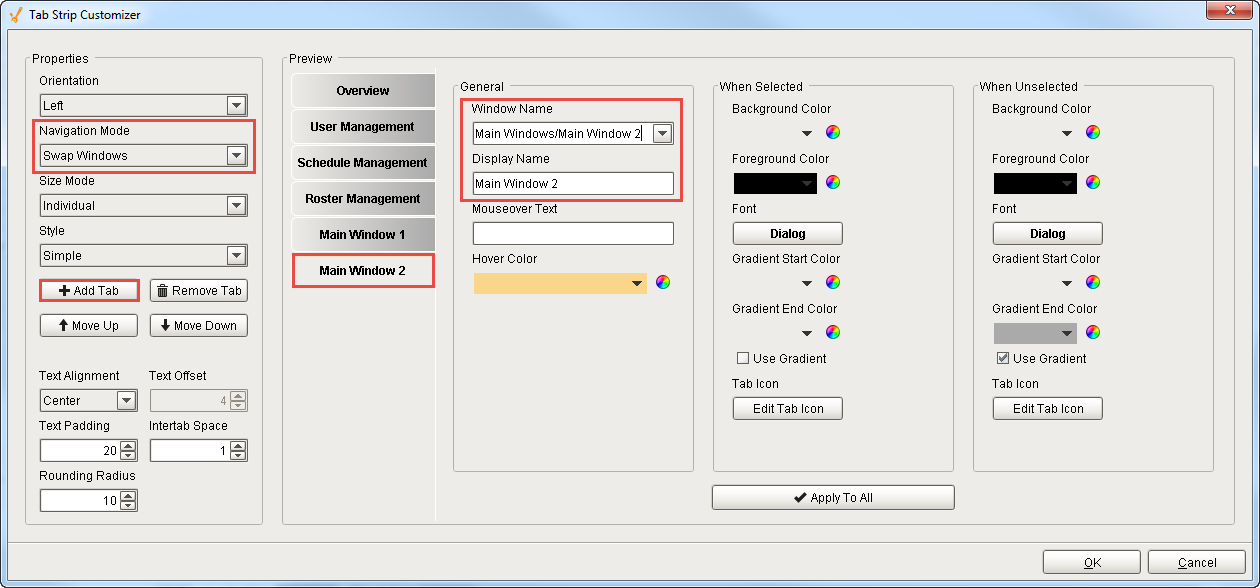
In the Tab Strip Customizer you can specify which window to open with each tab. Notice the Tabs component has a Navigation Mode property which is set to Swap Windows as shown in the screenshot below.
-
To create a new tab, click Add Tab. (This example creates a Main Window 2 tab)
If you have a tab already selected, clicking the Add Tab button creates a duplicate of the selected tab.Main Windows already created
This step assumes you already have your main windows created in your Project Browser.
-
Under Window Name dropdown list, select the window you want to open. Note it is the full path from the window and not just the name (i.e., Main Windows/Main Window 2).
-
Enter the Display Name for your new tab (i.e., Main Window 2).
-
With the Move Up, Move Down, and Remove Tab buttons you can move tabs on the tab strip, and remove a tab if it is no longer required.
-
When you're finished, press OK.
-
-
Save and Publish your project.
-
Open your project in the Client, and see that each tab navigates to a different window.
(You can also test your window navigation in the Designer, but only one window can be open at a time. To do so, use the Preview Mode to switch between windows.) -
As you can see, the Tab Strip works by clicking on a tab to swap one main window for another. If one of the windows happens to be a Popup Window, it will be treated as a Main Window by the Swap Windows mode.

Similar Topics ...