Gateway Area Network Settings
Overview
The Gateway Network allows you to connect multiple Gateways together over a wide area network. The Gateway Network provides the following features:
-
Websockets provide fast, firewall-friendly 2-way communication over a single configured connection.
-
A dedicated http data channel that can handle multiple streams of message data.
-
The ability to set up a node to act as a proxy for another node.
-
Security settings that restrict incoming connections based on a white list or on manual approval of the connection. Incoming connections can also be disabled entirely.
-
SSL mode available. When enabled, connections must send SSL certificates to prove their identity. A connection will not be accepted until its SSL certificate is approved.
Currently, the Enterprise Administration Module (EAM) takes advantage of the Gateway Network. The EAM uses the Gateway Network for message and file transfer, and can monitor network connections for availability. The EAM reports whenever a comm link is lost via alarm events and system tags. Many other features are planned to use the Gateway Network in the near future.
General Settings
Main
The Gateway Area Network General Settings set the basic rules for the system. By default, these settings are lenient to allow for easy setup but can be set for security.
Enabled : uncheck this checkbox to disable using the Gateway Area Network on this Ignition.
Web Sockets Enabled : If true, the system will attempt to use websockets in order to increase performance.
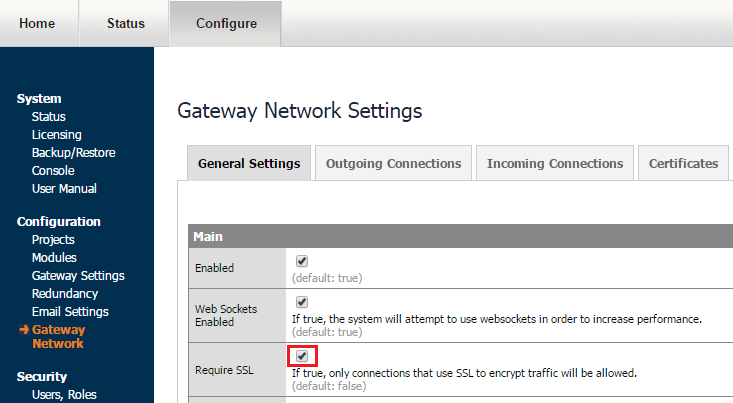
Require SSL : If true, only connections that use SSL to encrypt traffic will be allowed.
Require Two Way Auth : Controls whether both sides must explicitly trust each other before successful handshake. If you check this setting, you will need to provide the remote machine's certificate. To do this, manually export a certificate from the remote machine's metro keystore, located in <installdir>/webserver/metro-keystore. Default keystore password is metro, and the alias is metro-key. Then place the certificate on the local machine, in data/certificates/gateway_network
Overload Control
If there is too much traffic on the GAN, then it can tell Agents to stop sending messages for a specified amount of time.
Receive Queue Max : Number of received messages that can be held until they are processed by the local system. When this capacity is exceeded, the local system will start sending WAIT messages to remote machines.
Overload Wait Seconds : The number of seconds that a remote machine is instructed to wait before resuming message delivery. This setting is used when an overload is detected on the local machine.
Security
By default, the security level for incoming connections is set to “Unrestricted”, meaning that every remote machine that attempts to connect to the local machine will be accepted without question. You have several options to control security from the Gateway Network settings. Note that these settings are independent of SSL mode, which is detailed below. To change security settings, navigate to Configure -> Configuration -> Gateway Network and select the General Settings tab.
Allow Incoming Connections : uncheck this checkbox to disable all remote machines from being able to establish an incoming connection. To establish any connections with remote machines, you will need to create outgoing connections from this machine.
Connection Policy :
-
Unrestricted: default mode, allows all incoming connection unless the Allow Incoming Connections checkbox is unchecked
-
ApprovedOnly: incoming connections are created, but cannot be used to send or receive data until you approve the connection under Gateway Network -> Incoming Connections tab. To approve an incoming connection, click the Approve link on the right side of the connection. You can also deny a previously approved connection by clicking the deny link. Note that the approve and deny links will appear next to a connection only if you have enabled the ApproveOnly setting.
-
SpecifiedList: an incoming connection will on ly be allowed if its server name is on this list. Separate server names with a comma.
Specified List:
Connections with an ID in this list are automatically allowed if the security mode is set to SpecifiedList. Separate Gateway names with a comma.
Outgoing vs. Incoming Connections
When using the Gateway Network, you will be working with two type of connections. To establish communications, you create an outgoing connection on the local machine. The outgoing connection always begins the connection process to a remote machine. After the outgoing connection is created, the local machine will attempt to use the connection to establish communications with the remote machine. On the remote machine, an incoming connection will automatically be created when the new connection attempt is detected. For connections where security settings require manual approval, you will need to approve the incoming connection before it can be used. If no security controls have been set, the incoming connection will automatically accept the connection from the local machine and begin sharing data.
Connections and Servers
Every machine on the Gateway Network is known as a Server. When you establish a connection to a remote machine, the remote Server sends data about itself and also sends data about any other Servers known to that machine. For example, assume your local machine is Server A. The remote machine is known as Server B. Server B also knows about another remote machine named Server C. As soon as your local Server A establishes a connection with Server B, Server B also sends information about the existence of Server C. Modules such as the EAM are aware of this relationship and allow communication between Server A and Server C, even though there is no direct connection from the local machine to Server C.
Basic Setup
To establish a basic comm link between two Gateways, log into the Gateway where you want to establish the outgoing connection. Navigate to Configure -> Configuration -> Gateway Network and click on the Outgoing Connections tab. Click the “Create new” link.
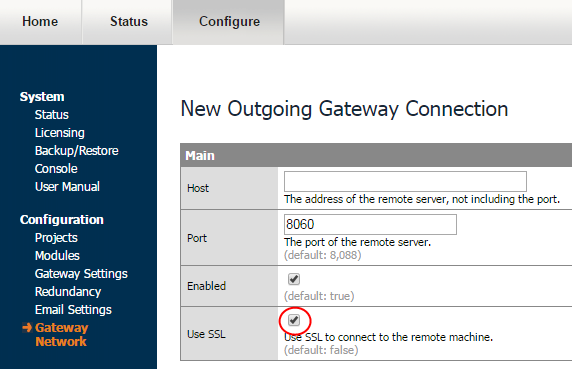
On the New Outgoing Connection page, you will need to enter the network address and port of the remote machine. Click the Create New Connection button at the bottom of the page.
On the Outgoing Connections tab, your new connection will be shown. After a few moments, the Gateway Name field will be updated with the name of the remote server and the status will be set to “Running”.
To view the incoming connection, log into the other Gateway and navigate to Configure -> Configuration -> Gateway Network and click on the Incoming Connections tab. Your new connection will be shown with “Connected” status.
Deleting Connections
Outgoing and incoming connections can be deleted for cases when the connection no longer exists on the other side. To delete a connection, navigate to Configure -> Configuration -> Gateway Network and click on either the Outgoing Connections tab or the Incoming Connection tab. Then click the delete link next to the connection. Note that for incoming connections, if a remote machine is still connected to the local machine with an outgoing connection, a new incoming connection will be created after deletion. For these cases, you must log into the remote Gateway and delete the outgoing connection. Then you can delete the local incoming connection.
Certificates
SSL and Certificates
When a remote machine establishes an incoming connection, its Gateway server name is transmitted and appears in the Server Name field under Gateway Network -> Incoming Connections. However, there no identity authentication is performed when the connection is created. The local system accepts the remote system id without question. To perform identity authentication on a connection, you must use Secure Socket Layer (SSL) and certificates.
-
To enable SSL on the Gateway Network, you must enable SSL in two places. On the machine that will receive incoming connections (which we will call Server A), you must navigate to Configure -> Configuration -> Gateway Network, click on the General Settings tab, and check the Require SSL checkbox. This mode requires all incoming connections to use SSL mode. Any existing incoming connections will become faulted as they are not using SSL. Click the Save Changes button.
-
Next, log into a Gateway where you wish to establish an outgoing connection. We will call this Server B. Navigate to Configure -> Configuration -> Gateway Network and click on the Outgoing Connections tab and click the “Create new” link. As you are entering the settings for the new connection, check the Use SSL checkbox. Also, change the Port to the SSL port used by the other machine. By default this is set to 8060 (which is defined /data/gateway.xml). Save the new connection.
Note that this port is different from the default SSL port an Ignition Gateway would use when communicating to a client (default port 8043).
-
At this point, Server B has transmitted its certificate to Server A. But Server A has never seen this certificate, and so the incoming connection is not yet allowed. Note that the Server B’s connection will NOT show up under the Incoming Connections tab until AFTER the certificate has been approved. But if you click on the Certificates tab, Server B’s certificate should be present.
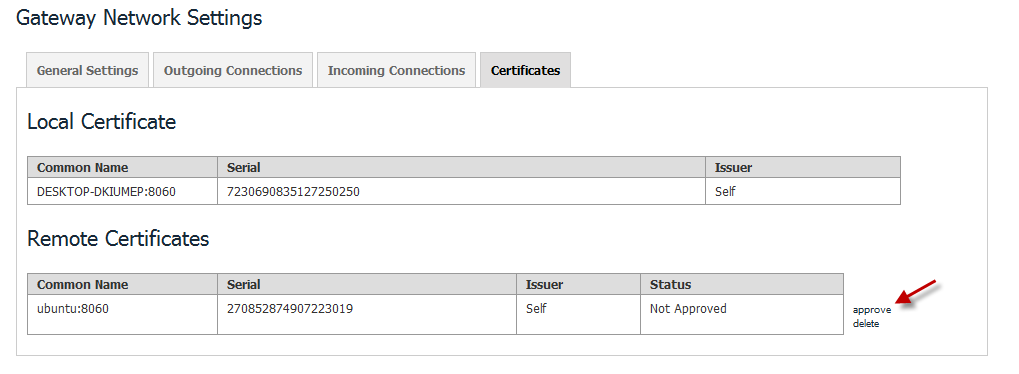
The certificate Common Name field holds the network address of the machine that transmitted the certificate. The Serial field holds a numeric string that is automatically generated when the certificate is created, and is unique to every certificate. Click the approve link to approve the certificate. After certificate approval, the incoming connection will be accepted, and will eventually appear on the Incoming Connections tab. It make take up to 30 seconds for the connection to appear, as reconnect attempts are made every 30 seconds by default (controllable by the Missed Pings outgoing connection setting).
After a certificate has been approved, and the incoming connection is established, you can view the certificate information for a specific incoming connection under the Certificate field in the Incoming Connections tab. The certificate common name and serial number are displayed here, and reflect the actual certificate that was sent by the remote machine.
You can deny a certificate under the Certificates tab by clicking the deny link to the right of the certificate. The connection that has been using that certificate will not longer be allowed to connect. You can delete certificates that are no longer in use. Keep in mind that if you delete a certificate, and a remote machine is still using that certificate, it will reappear on the Certificates page. In this case, you must navigate to the remote Gateway and delete its outgoing connection. Then you can permanently delete the certificate from the Certificates page.
Gateway Area Network Technical Information
Web Sockets
The web socket protocol rides on top of the TCP protocol, and allows 2-way communications between machines. Either side can send a message to the other side at any time. If web sockets cannot be used on your network, or your network setup does not require a high-speed low-latency connection, the Gateway Network connections can use a pure HTTP long polling system for communications. This mode uses standard HTTP GET and POST messages for communication, and is appropriate for situations when an always-on connection is not practical. An example would be a Gateway that communicates once every 15 minutes over a cell connection. Message retrieval is not as efficient as web sockets, as regular polling of the remote machine is required to learn of new messages. To enable HTTP long polling, you must either disable web sockets under either Gateway Network General Settings (to disable for all connections) or disable web sockets on an outgoing connection.