Color SVG Dynamically
Introduction
In Ignition, one useful HMI technique is to color an individual component of the SVG (Scalable Vector Graphic). Whether you are bringing in a vector graphic from the Symbol Factory or importing an SVG from your computer, you can easily color in individual components of your SVG.
As with almost everything in Ignition, there are multiple ways of accomplishing the same result. For each component of the SVG, there are different binding types you can use to dynamically change the color based on a value.
There are a few pieces of assumed knowledge in this article that are common to all the coloring options. Click to learn more about each.
What is a "Component of the SVG?"
There can be many components inside an SVG. These components are often referred to by a number of different names: sub-components, members, parts, pieces, etc. All these names mean the same thing. For clarity, we will refer to an individual item inside an SVG as a 'component of the SVG.'
Pre-made SVGs from Symbol Factory and selecting components of the SVG.
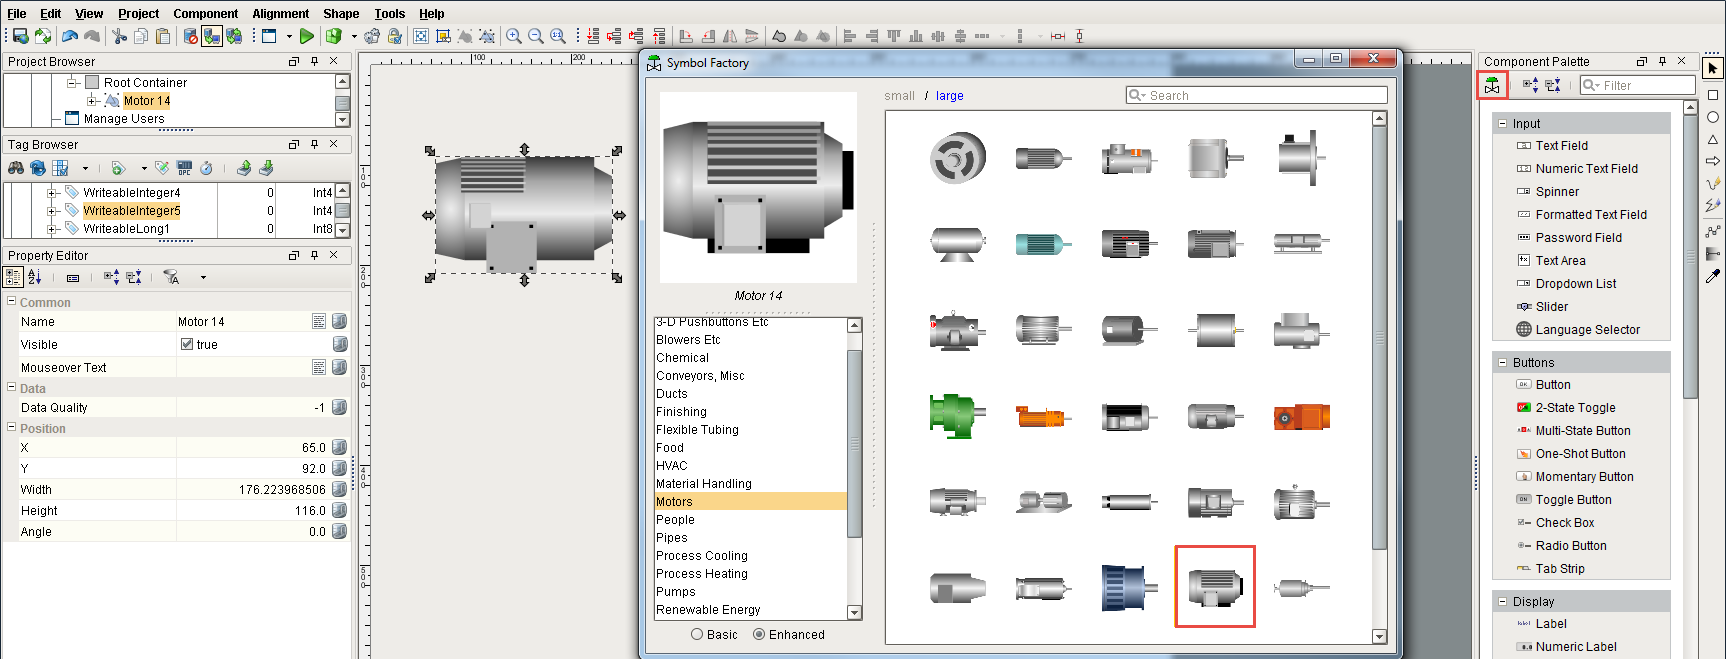
The Symbol Factory has a library of symbols to choose from. Choose your symbol and drag it to your workspace.
In Designer, open the Symbol Factory ![]() in the Component Palette and drag a motor on to your workspace.
in the Component Palette and drag a motor on to your workspace.
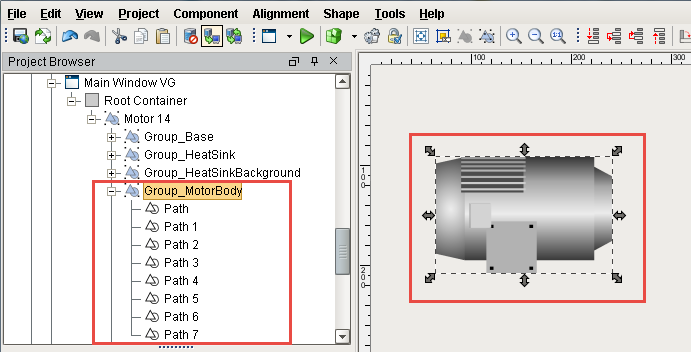
When you drag a vector graphic into a window, it’s not just one flat image, it’s actually comprised of many individual components.
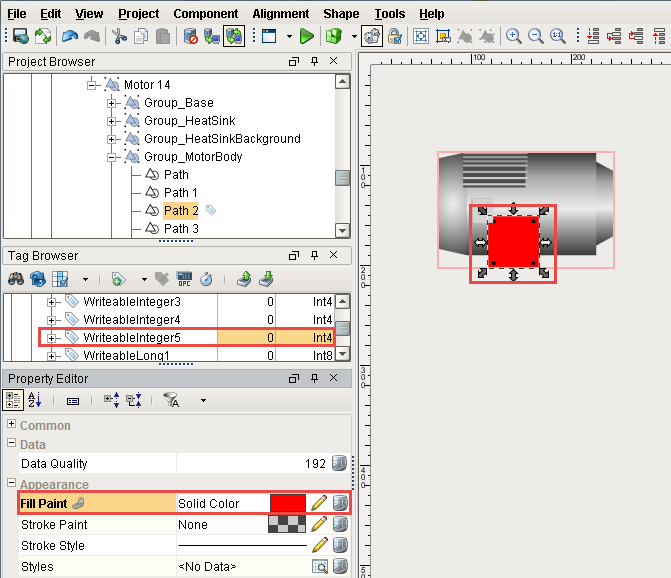
Expand the vector graphic in the Project Browser. You can see that the Motor is made up of many different components of the SVG. Each of these components can be colored independently.
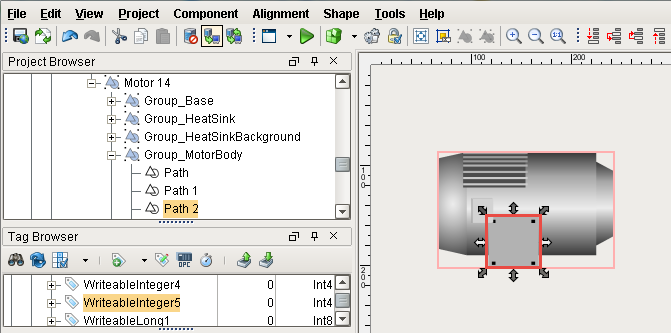
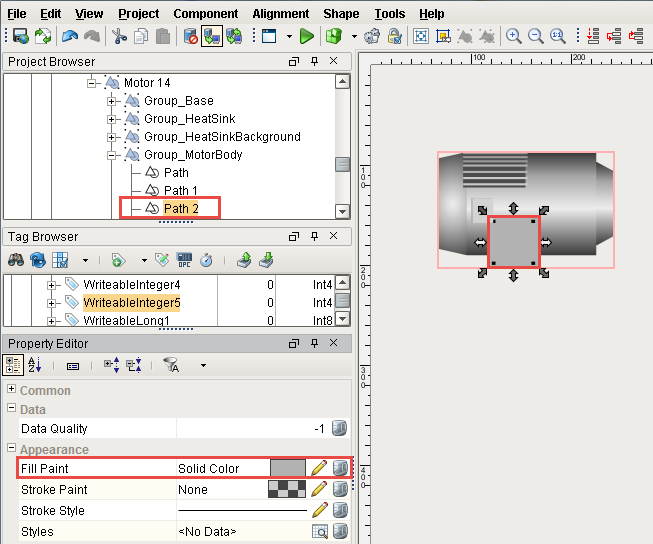
In this example, let's select the square as the individual component of the SVG. Double click on the Motor, double click the square, and then single click on the square again.
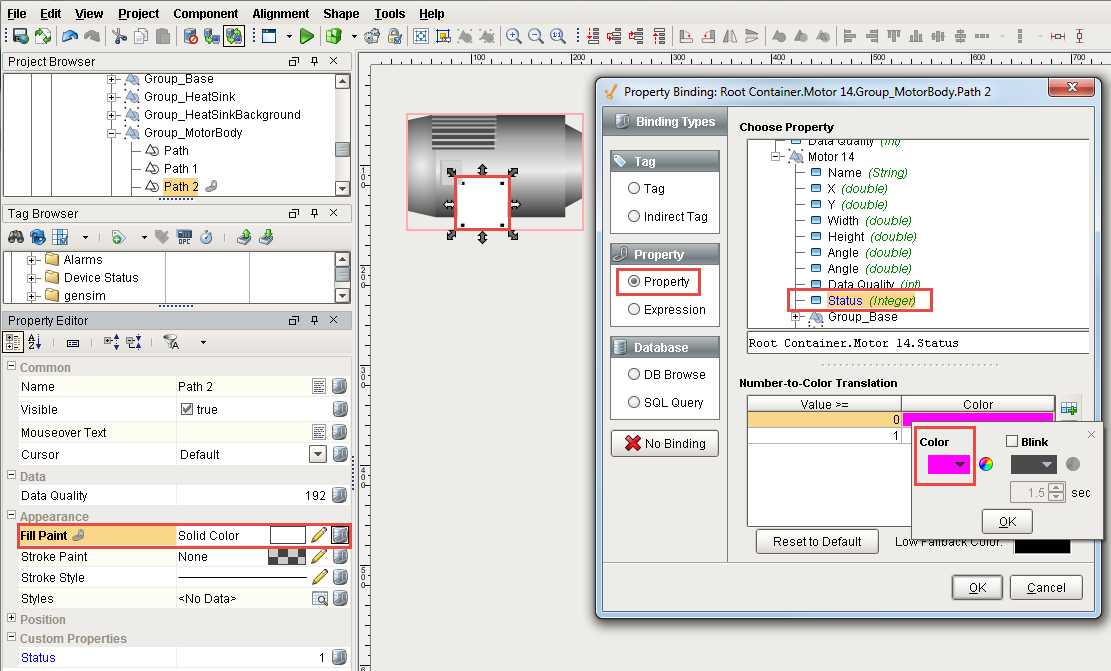
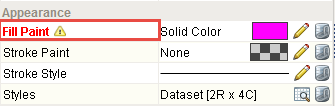
Every individual component of the SVG has a Fill Paint property that can dynamically change based on a value. Click on the Fill Paint property binding icon.
Once you have the Fill Paint selected, you can bind it to a Tag or anything else you want. Since there are a number of ways to bind the Tag, let's explore our options in the following sections.
Tinting an SVG
This page talks about coloring a specific part or parts of an existing SVG. There is also a way to tint the entire SVG one color. Click here to learn more about applying a Tint to the entire SVG.
Can't write to your tag during testing?
While testing, if you are unable to write to a Tag in the Tag Browser or through buttons in the designer, you might not have it set to allow writes. The first time you try to write, a window will popup in the Designer stating you are in Read Mode. Choose 'Enable Read/Write Mode' so you can write to your Tags for testing.
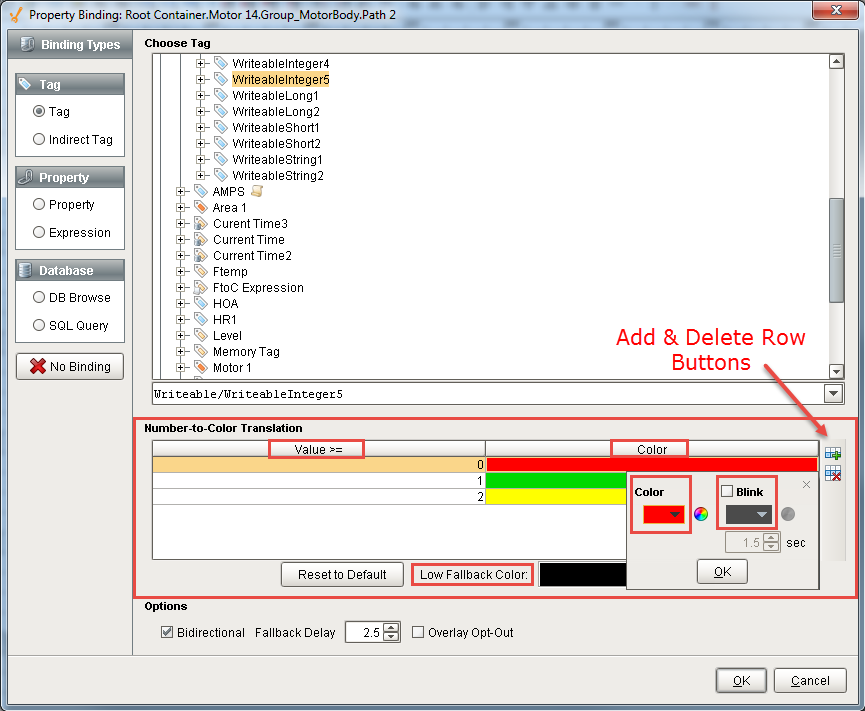
Number-to-Color Translation Table
The Fill Paint property uses the Number-to-Color Translation table in Ignition, commonly known as Color Mapping. This is where you map a value to a color. For every number range there is a set color. You can choose a different color for each value, and even make it blink between two different colors. If you need to add or remove a value, simply use the add row ![]() and remove row icons
and remove row icons ![]() on the right side of the Number-to-Color Translation table. In this SVG example, value '0' is set to red, value '1' is set to green, and value '2' is set to blink between yellow and orange. If you are using this as a tint overlay, make sure each color is semi-transparent so you can see the actual symbol behind it. There is a Low Fallback Color option so when a value falls below your lowest value, a default color can be set.
on the right side of the Number-to-Color Translation table. In this SVG example, value '0' is set to red, value '1' is set to green, and value '2' is set to blink between yellow and orange. If you are using this as a tint overlay, make sure each color is semi-transparent so you can see the actual symbol behind it. There is a Low Fallback Color option so when a value falls below your lowest value, a default color can be set.
Tag Binding
A Tag Binding is a very straight-forward binding type. It simply binds a single property directly to a Tag. For this example, every time the Tag binding is evaluated, the Fill Paint property changes, pushing the new color to the component of the SVG. To learn more about tags, refer to the section on Understanding Tags.
Bind the Fill Paint property to any numeric Tag. If you are not familiar with numeric, it's any number value. Integers are the best, but you can also use a boolean, float, etc. In this example, ‘WriteableInteger5’ was selected. Set the values in the Number-to-Color Transition table to drive the color of a component of an SVG.
-
On Value 0, make the component red by double clicking on the first row. Under Color, select red and press OK.
-
On Value 1, make the component green. Double click the second row and under Color, select green and press OK.
-
Add a row by clicking the Add Row icon .
-
On Value 2, make the square component blink between yellow and orange. Double click the third row and check the Blink box, and select the colors yellow and orange.
-
Press OK.
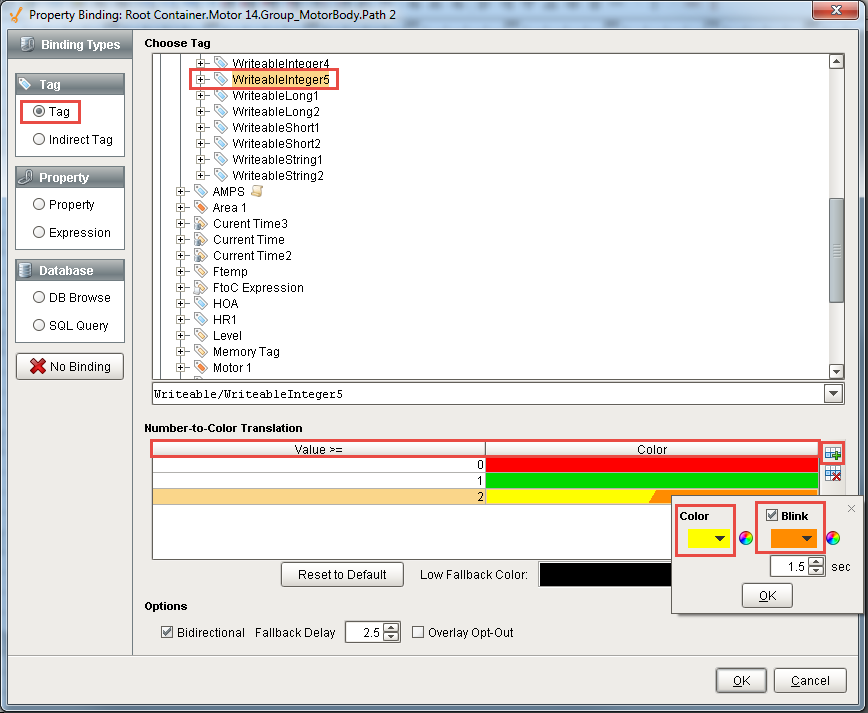
Once you press OK button, you’ll notice that the component of the SVG changed color based on the current value of the Tag. The Value is set to '0' and the color is red. To change the Tag value, go to the Tag Browser, double click on your tag value, and change the value from '0' to '1'. Press Enter. The component of the SVG will change from red to green. Now, change the Value from '1' to '2', and the color will blink yellow and orange.
Property Binding
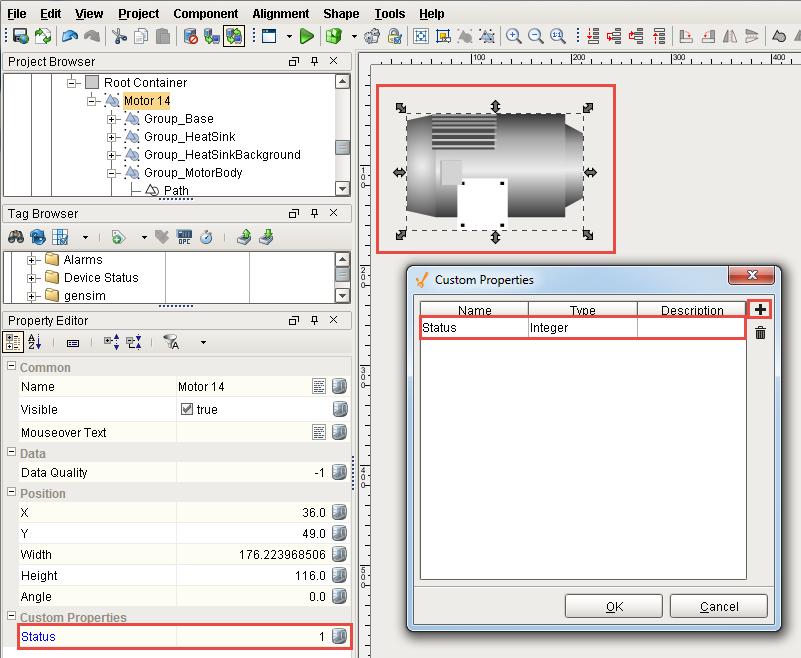
You can use the same number to color translation table with a property binding. Custom properties are extremely useful because they can turn your plain component into one customized for your particular use. Adding Custom properties like Status or Level can transform your SVGs into more than just an image. Refer to sections on Property Binding and Component Customizers to learn more.
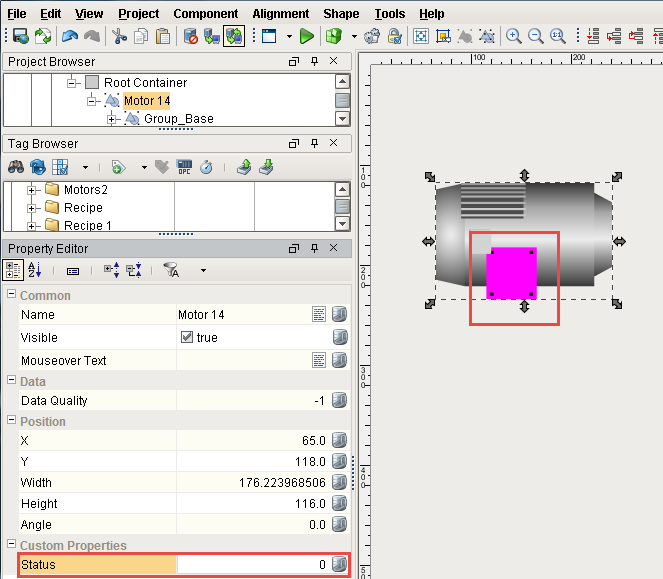
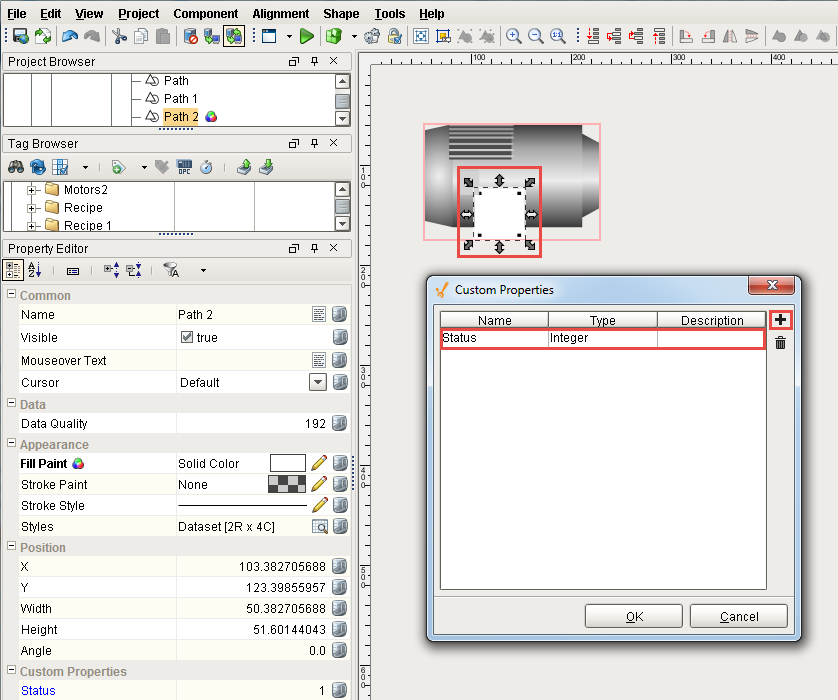
Drag in a Motor SVG and create a custom property on the Motor called 'Status.' In this example, right click on the Motor and select Customizers > Custom Properties. Enter the name 'Status' and use the default 'Integer' type. Press OK.
Click the Fill Property icon, and select the Property binding type. Under the Motor object, select your new 'Status (Integer)' property. Choose your colors and values. Press OK.
Once you press OK, you’ll notice that the square component of the SVG changed color based on the value of the tag. An Integer value defaults to '0' and in this case the color is purple. To change the tag value, go to the Property Editor, double click on the Status property value, and change the value from '0' to '1'. Press Enter. The component of the SVG will change from purple to whatever color you set '1' too.
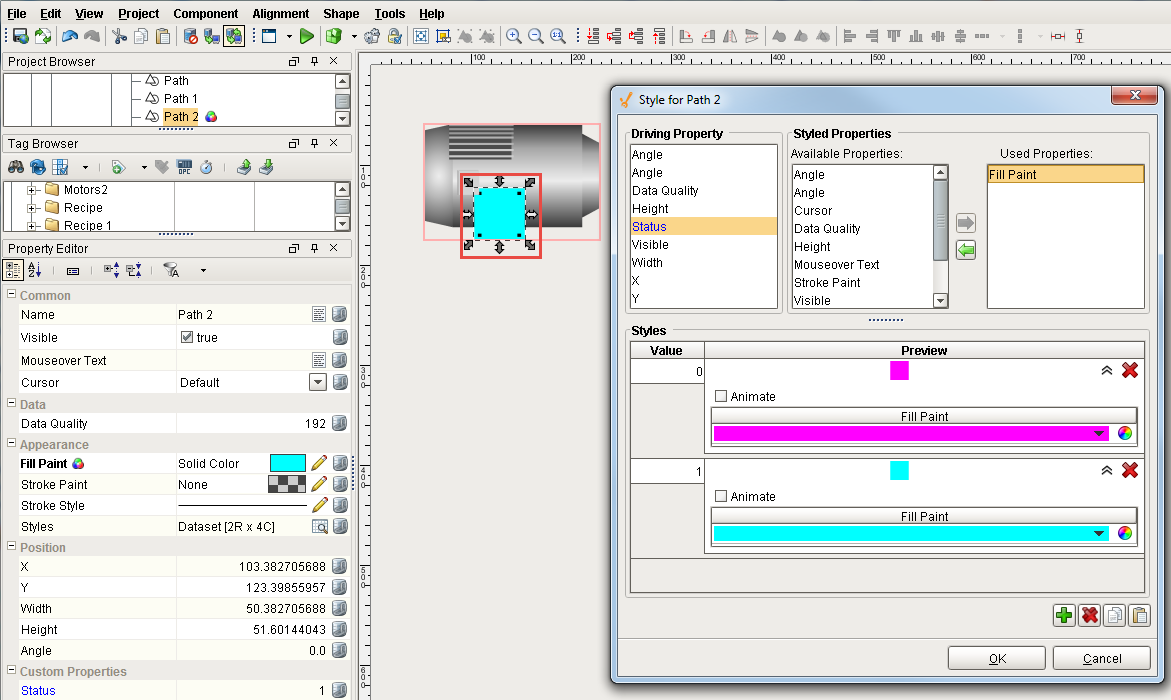
Style Customizer
You can also use the Style Customizer to achieve the same result as with the Property Binding. Like the previous example, we will need a Status property to drive the style. Let's create that same Status property on the inner component of the SVG. Select the component of the SVG, right click and scroll down to Customizers > Custom Properties. Enter the name 'Status' and use the default 'Integer.' Press OK.
With the inner component still selected, right-click and select Customizers > Style Customizers. Select the Status property as the driving property, select Fill Paint from the list of Styled Properties, and then choose your colors for each value, adding values if needed. Press OK.
To change the Tag value, go to the Property Editor, double click on the Status property value, and change the value from '0' to '1'. Press Enter. The component of the SVG will change from purple to whatever color you set it too.
In the event you see the Fill Paint property highlighted in red, this is a warning message that you have two competing property bindings that should be resolved. In this case, this warning message popped up because the Fill Paint property has both a Binding, and a Style applied to it.
Direct Bindings
There are several types of Bindings that can be used to set colors directly, without using a mapping table.
Expression Binding
You can use the expression language to calculate a value. If you have a color that depends on multiple properties, then using an express is recommended to evaluate correctly. Here are a few examples. The first example returns a static color using the Fill Color property.
// binding on the Fill Color propertycolor(255,0,0) // static red colorThis example takes a Tag value and translates it to a color that ranges from white to blue as the Tag value increases.
// binding on the Fill Color propertycolor(255,255,255-({tag value}/100*255)) // fades from white to blue when Tag value goes from 0 to 100 %If you have multiple properties or Tags, you can use the logic Expression Functions to select between a few colors.
if({Tag1}>50, if({Tag2}, 3, // if tag1>50 and tag2 is true 1), // if tag1>50 and tag2 is false if({Tag3}, 2, // if tag1<=50 and tag3 is true 0)) // if tag1<=50 and tag3 is falseThis example takes one integer value and selects from several options.
// binding on the fill color propertyswitch({HOA tag}, 0,1,2, // off, on, hand color(255,0,0), color(0,255,0), color(255,255,0), // red, green, yellow color(0,0,0)) // black (fallback color)SQL Binding
SQL Query bindings only have to return a string that can be translated to a color. Any set of RGB values can be listed using an integer representation ie: "255,0,255" or HEX "FF00FF".
-- A basic static query that returns the hex code for tealSELECT "00FFFF"-- A static query that concatenates integers to return a string RGB Code for yellow: "255,255,0"SELECT CONCAT(255, ',', 255, ',', 0)
In most cases you will be using a table in the database. Assuming the following table (where background and foreground are strings):
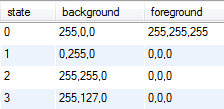
-- This query returns the background string RGB code for state #3 from the colors_tableSELECT backgroundFROM colors_tableWHERE state = 3
Similar Topics ...